Meridian Mail - FAQ
(or cursor keys)Option's 51/61/81: Large systems will have a dedicated VT220 terminal for Meridian Mail. Login directly from it (9600 8N1).
Option 11: First log onto the PBX from the PBX TTY maintenance terminal.
At the > promt, type AX and press enter. You will be greeted by the Mail interface ('ctrl-r' or 'ctrl-w if' to refresh the screen if it's mangled).
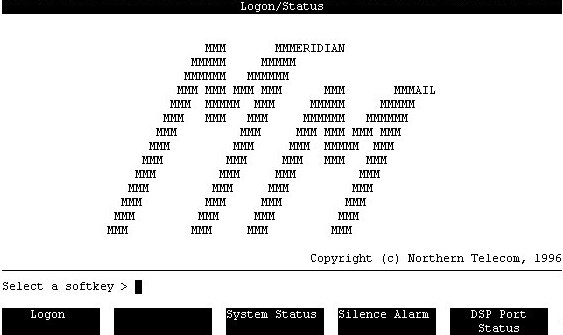
Press F1 Logon softkey to log in, MM will prompt for the admin password.
If the password is correct, MM will then display the Main Menu choices.
Press the F1 softkey to Log off and return to the MM Login screen.
To exit, type ctrl ] - (the control key and 'close square bracket' together).
Note: Hyperterminal 6.3 ![]() has VT220 support. PuTTY also works very well, see: PuTTY and Meridian Mail
has VT220 support. PuTTY also works very well, see: PuTTY and Meridian Mail
Hit the Logon softkey (F1), followed by one of the following usernames...
system <adminpwd> Login used for day-to-day system administration customer <custpwd> Customer administration on multi-customer systems tools <adminpwd> Tools level login for administration tools support
The default passwords must be changed during installation. WRITE YOURS DOWN!
If you cannot find the passwords, it may be necessary to Reset the sys-admin password.
This should be a last resort as it requires booting from the installation media, and will invoke down-time.

It's Joan Kenley, a k a "Meridian Mary", or "Phantom of the Operator."
Recognized as the "voice of voicemail", her distinct warm, friendly voice, is used for:
- CallPilot and Meridian Mail
- Pacific Bell Message Center
- Verizon Information Services
- Sprint Spectrum PCS
She is also the voice in National Semiconductor's talking cash registers, cars, elevators, and other electronic equipment.
Joan's voice has appeared in numerous television and radio commercials, The Simpsons, South Park, and more. Joan died on November 26, 2020 in the USA.
Meridian Mail uses Application Keypad mode, which should be enabled in your terminal program. In this mode, the numeric keypad and function keys send special Escape-codes. If the terminal application is not sending these codes:
- Re-launch (or reset) your terminal, and enable Application Keypad.
- Type
CTRL-Rto redraw the screen. The function keys should now work.
MAT's (Optivity) terminal program supports VT220 emulation, and Meridian Mail softkeys.
Hyperterminal 6.3 ![]() supports Application Keypad mode, Softkeys 1 - 5 are Function Keys F6 thru F10
supports Application Keypad mode, Softkeys 1 - 5 are Function Keys F6 thru F10
With PuTTY, Softkeys 1 - 4 are Function Keys F1 to F4. Softkey 5 is Enter, and Help is Del on the Numeric Keypad.
In Serial (Mac OS X) Application Keypad mode is automatic, and Softkeys 1 - 5 are mapped to F1 thru F5. Additionally, holding down the "fn" key on a laptop keyboard while pressing 0-9, Enter, or ./-, simulates a numeric keypad key press (as below).

The following Escape-codes are used in Meridian Mail:
| Softkey 1 | Softkey 2 | Softkey 3 | Softkey 4 | Softkey 5 | Delete Field | Help |
|---|---|---|---|---|---|---|
| Esc O P | Esc O Q | Esc O R | Esc O S | Esc O M | Esc O m | Esc O n |
| Prev Word | Next Word | Prev Field | Next Field | Prev Page | Next Page |
|---|---|---|---|---|---|
| Esc O r | Esc O q | Esc O t | Esc O u | Esc O w | Esc O x |
For example, to send Softkey 5, press the escape key followed by O, and M keys (press shift!).
Escape (Esc) can be sent by pressing CTRL-[ (ASCII code 27), or hitting the Esc key.
If you power down your terminal and then power it back up, the screen may be drawn incorrectly. If the screen is corrupted, you see a row of q's, or other strange character, instead of the line near the bottom of the screen above the softkeys.
To redraw a corrupted screen, follow these steps:
- Press
CTRL-W
Result: A small window opens (shown right). - Make sure MMI is selected, use the up/down keys to change it.
- Type
I-F
Note: You do not have to press <Return>.
The I means initialize, and the F means full screen.
Press CTRL-R at any time to redraw (refresh) the screen.
To toggle "automatic printing", press CTRL-W-P
When enabled, 'AUT' appears at the bottom of the screen.
UPDATE: See PuTTY and Meridian Mail, so the display works as expected.
Check the LOGIN STATUS of the voice mail box. Here's how:
- Login to Meridian Mail!
- Select
USER ADMINISTRATIONfrom the menu picks - Select
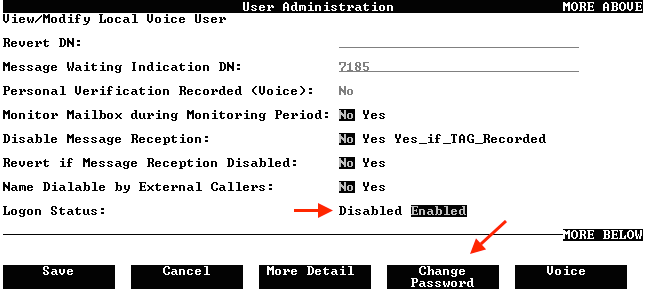
LOCAL VOICE USERfrom the menu picks - Press the VIEW MODIFY softkey (softkeys on screen are associated with F6 through F10 function keys)
RESULT: You are prompted for a mailbox number. - Enter the user's mailbox number and press <RETURN>
RESULT: The VIEW/MODIFY LOCAL VOICE USER screen is displayed. - Move HighLight to LOGON STATUS field (move HighLight by up and down courser keys)
- Check if status is Disabled or Enabled. If Disabled, set to Enabled using right and left courser keys.
- Press
SAVEsoftkey. - Inform user his/her mailbox password is enabled
- If the user has forgotten their password, reset it as per below...
- Login to Meridian Mail!
- Select
USER ADMINISTRATIONfrom the menu picks. - Select
LOCAL VOICE USERfrom the menu picks. - Press the
VIEW/MODIFYsoftkey.
RESULT: You are prompted for a mailbox number - Enter the user's mailbox number and press <RETURN>
RESULT: The VIEW/MODIFY LOCAL VOICE USER screen is displayed. - Press the
CHANGE PASSWORDsoftkey
RESULT: You are prompted for a new password. - Enter the new password and press <RETURN>
RESULT: You are prompted to reenter the new password for verification. - Enter the new password again and press <ENTER>
- Press SAVE softkey.
- Notify the user of the new password.

View/Modify local Voice User
Enable Logon Status, and Change Password.
Log into Mer Mail and select "User Administration" from the main menu. Then select "Local Voice User". From here, select "Find" from the softkeys at the bottom of the screen. Leave the status on "Any" then select print from the softkeys. This should print out an alphabetical list of all users.
- At a telephone, dial the
VOICE PROMPT MAINTENANCE DN
RESULT: The system prompts you for the ID - Enter the ID of the announcement that you want to to modify and press the number sign (#)
RESULT: The system prompts you for the Update password (usually the same as the ID number) - Enter the Update Password and press the number sign (#)
RESULT: you are prompted to use PLAY or RECORD - The system plays a menu with choices:
a. Record a new announcement - press <5>
b. Listen to existing announcement - press <2>
To record an new message press 5 and start recording.
When finished press the number sign (#). To listen to your new recording press 2.
- Login to Meridian Mail!
- Select
VOICE ADMINISTRATIONfrom the menu picks - Select
VOICE SERVICESfrom the menu picks - Select
VOICE ANNOUNCEMENT DEFINITIONfrom the menu picks - Look for the announcement you wish to update and the ID number associated with it
- Login to Meridian Mail!
- Select
VOICE ADMINISTRATIONfrom the menu picks - Select
VOICE SERVICES ADMINISTRATIONfrom the menu picks - Select
VOICE SERVICES DNfrom the menu picks - Look for
VOICE PROMPT MAINTENANCESand the DN number associated with it
Meridian Mail gets its time from the PBX, it receives time stamps over the Application Module Link (AML) at regular intervals. However, if you will be configuring the MM database when the AML is down, you will have to set the system time.
Note: Once the AML is up, the switch time will override the Meridian Mail time.
To manually change the system time, follow these steps:
- Select General Administration
Result: The General Administration screen appears. - Select Change System Time
Result: You are prompted to enter the date and time. - Enter the date and time, and press <Return>.
Result: The time is recorded, and the General Administration screen is redisplayed. - When you have set the system time, press <Exit>.
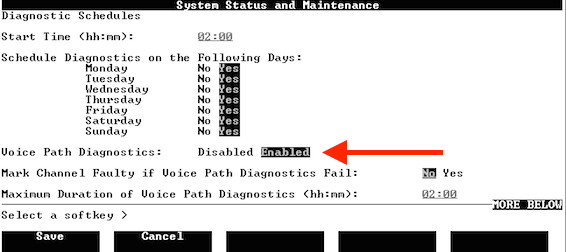
This is caused by a nightly routine in Meridian Mail to test outdial (at default 2 am).
The fix is to disable voice path diagnostic testing in the Diagnostics Schedules screen.

The following drives and tapes are supported:
| Tape drives | Tape formats | Tape media | Tape capacities |
|---|---|---|---|
| Tandberg 4220 and Tandberg 2500DSE | QIC-24 (Read) QIC-120 QIC-150/QIC-150 QIC-525 QIC-1000 QIC-2GB/QIC-2GB | DC300XL DC600 DC6150/DC6250 DC6525 DC9100 Magnus 2.0/Magnus 2.5 | 40 Mbytes 60 Mbytes 155 Mb/250 Mbytes 525 Mbytes 1 Gbytes 2 Gbytes/2.5 Gbytes |
| Archive 2150 | QIC-24 (Read) QIC-150 | DC300XL DC6150/DC6250 | 40 Mbytes 155 Mbytes/250 Mbytes |
See Tape drives, and tapes for more details.


