Auto Provision via TFTP
There are several ways to provision a Nortel/Avaya IP set:
- Manually: All settings are entered manually on the set in the Local Tools Menu, the default password is: [color*set]
- Semi-automatic: A DHCP server with Option 66 sets the TFTP server address (for firmware updates), and extended Option 128 (the 'Nortel-i2004-B' string) provides the Call-Server info. Node ID and TN are manually entered on the set.
- Fully Automatic: A combination of DHCP, and provisioning file(s) hosted on a TFTP server. These files can configure parameters based on set-type, zone, or device, in addition to registration info, and set TN. Nothing is entered on the set.
When deploying a large number of sets, the third method is obviously the most desirable, and the one described here.
- You can use TFTP to provision all parameters in the info block via the provisioning files.
- You still require a DHCP server to provide an IP address, and the TFTP servers IP address.
- A text file (eg: system.prv) must be maintained with IP set MAC address and registration info.
Important: Auto provisioning is supported on the 2007, 1100-Series, 1200-Series IP sets. You cannot provision 2001, 2002, and 2004 IP sets with an Info Block using provisioning files. You can only provision these sets with an Info Block using DHCP.
If Auto Provisioning is already set up on your system, jump directly to adding a new set...
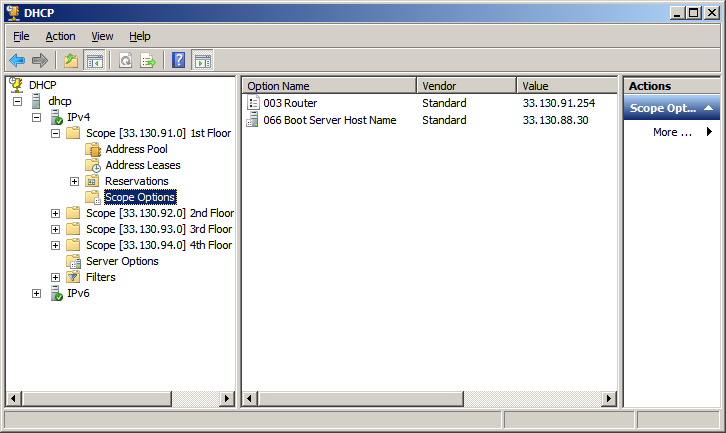
DHCP Server
The DHCP server is required to define:
- Option 3: Gateway address - as a 'Scope Option' (if required)
- Option 66: TFTP server address - as a 'Server Option' (provisioning server)
No other DHCP options are necessary, as the TFPT provisioning server will provide the additional configuration files.
Note: If your network is not flat, ie, you are using a gateway, remember to configure "Routes" to the IP sets on the CS1K.
TFTP Server
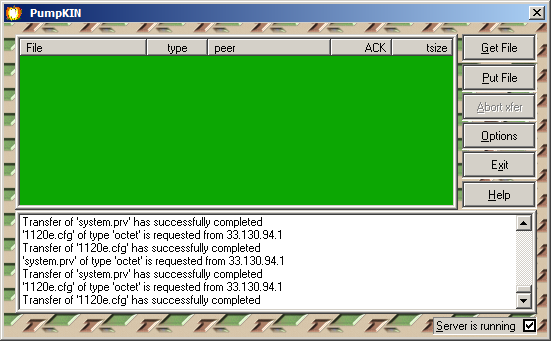
Configure a TFTP server, and add a shortcut to Startup items. Consider configuring Auto-Logon to automatically re-start the server after a power failure.
The image below shows the PumpKIN configuration options:

Now we are ready to create the provisioning file(s), and copy them to the TFTP servers root directory.
A minimum configuration (described here) requires at least 3 files in the server root, for example:
- 1120e.cfg - a firmware definition file referencing the binary firmware file
- 0624C8Q.bin - the binary firmware file referenced from the corresponding .cfg file.
- system.prv - system and phone options and configuration details
Firmware
An IP set will try to load firmware and font resource files using parameters stored in the <type>.cfg file.
Obtain the most recent IP set firmware files. Create a text file defining the name and filename of the firmware file.
Name the file the model of the phone, such as 1140e.cfg for an 1140e, or 1120e.cfg for an 1120e. Repeat for each model deployed:
# Config file: 1120e  C8Q
[FW]
DOWNLOAD_MODE AUTO
VERSION 0624C8Q
FILENAME 0624C8Q.bin
PROTOCOL TFTP
For example, if using file 0624C8Q.bin, VERSION line should read: VERSION 0624C8Q, and FILENAME line should read: FILENAME 0624C8Q.bin. Both files, the .bin and .cfg, must be placed in the TFTP server root directory.
Default filenames:
- i2007: i2007.cfg, 0621Cxx.bin
- 1110: 1110.cfg, 0623Cxx.bin
- 1120E: 1120e.cfg, 0624Cxx.bin
- 1140E: 1140e.cfg, 0625Cxx.bin
- 1150E: 1150e.cfg, 0627Cxx.bin
- 1165E: 1165e.cfg, 0626Cxx.bin
- 1210: 1210.cfg, 062ACxx.bin
- 1220: 1220.cfg, 062ACxx.bin
- 1230: 1230.cfg, 062ACxx.bin
Note, the firmware FILENAME (and path) of the actual firmware image is specified in each .cfg file, and can be any name.
Alternatively, update each phone firmware in Element Manager.
Provisioning Files
Create a text file, named system.prv, defining the relevant Info Block Parameters, and set registration parameters, eg: Node ID, IP set MAC address(es), and TN assignment(s). If you are adding a lot of phones, consider using a bar code reader (in keyboard mode) to enter the MAC addresses (printed on a label on the box).
A working system.prv example:
# To add a phone, copy/paste the last line, edit the MAC address and TN
# Create the TN on the PBX in the normal way in LD 11.

# Options

s1ip=192.168.30.17;              # Primary server IP address
p1=4100;                         # Primary server port number
a1=1;                            # Primary server action code
r1=5;                            # Primary server retry count
lldp=y;                          # Enable 802.1ab (LLDP)
pcuntag=y;                       # Enable PC port tags stripping
menulock=p;                      # Menu partial lock mode
cachedip=y;                      # Enable cached IP

# Phones

reg=CCF954E08A69 CS1K S1 5881 252-0-00-00;
reg=CCF954E08A70 CS1K S1 5881 252-0-00-01;
reg=CCF954E08A71 CS1K S1 5881 252-0-00-02;
reg=CCF954E08A72 CS1K S1 5881 252-0-00-03;
Above, four IP sets are defined by their MAC address. The Node ID (here 5881), primary server address (S1), and TN are provisioned. Use the format: reg=<MACaddr> <CallServerType> <ConnectServer> <NodeID> <TN>;
A space, comma, or dash can be used as a delimiter. End each line with a semi-colon.
Note: If 252 is our virtual superloop, the TN range is: 252 (0-1) (0-15) (0-31). There are 32 units (0-31) per virtual line card, 16 line cards (0-15) per virtual shelf, and 2 virtual shelves (0-1). Therefore, a maximum of 1024 units are supported per virtual superloop.
Finally
Plug in the set, and apply power. It will:
- Obtain an IP address, and look for the TFTP server.
- Check 1120e.cfg (or appropriate) whether a firmware upgrade is required.
- Check system.prv for the provisioning data, and other configuration options.
- Connect to S1. The NODE ID and TN will auto-fill, no intervention is necessary.
- If the TN has been built (in LD 11), the set will load its DN and other key assignments.
Personal Directory
In order for last-number redial and caller-log softkeys to appear on IP sets, check the following in Element Manager:
- IP Network ► IP Telephony Nodes ► Personal Directories (PD)
Check box next to Personal Directory Server: Enable Personal Directory (PD) service on this node. - IP Network ► Personal Directories ► Server Configuration
Enter the ELAN Signaling Server IP address at Server IP Address
Sync and 'restart applications' for any changes to take effect.
Adding a new set
If Auto Provisioning via TFPT is already set up, to add a new set, follow these steps:
1. Locate the system.prv file. It will be in the root directory of the TFTP server.
2. Open the system.prv file in notepad, and duplicate the last 'reg=' line (select it, ctrl-c, enter, ctrl-v)
reg=CCF954E08A72 CS1K S1 5881 252-0-00-03;
reg=CCF954E08A72 CS1K S1 5881 252-0-00-03;    line duplicated by copy/paste
3. Edit the MAC address for the new device (its on the box) and increment the TN appropriately.
reg=CCF954E08A72 CS1K S1 5881 252-0-00-03;
reg=CCF954E08A76 CS1K S1 5881 252-0-00-04;    MAC and TN edited for new set

3. Save the system.prv file with your changes. Its a good idea to save a backup somewhere too.
4. Build a new set on the CS1000 by your favorite method. Eg, copy the previous TN, and change the DN.
>ld 20
PT0000
REQ: cpy 1        copy to 1 new
TYPE: 1120        type must match
CFTN 252 0 0 3    copy from TN
DES  myset

*** MAKE PRINTER READY ***
TN   252 0 0 4    to new TN
DN   3552         with new DN
NEW 1120    TN  252 0 0 4     DN  3552

*** FINISHED ***
5. Plug-in! The new set should boot, update firmware, connect to S1, then load its DN and other key assignments.
Check registered phones
In LD 117, enter: stat iset all, an example output shown below.
stat ss prints the Signaling Server status, including Node ID, and the number of sets registered.
=> stat iset all
Set Information
---------------

IP Address    Type    State    Regd-TN           HWID                  FWVsn  Prime DN  DES    Node  TPS TLAN IP
------------  ------  -------  ----------------  --------------------  ------ --------  ------ ----  ------------
10.11.9.125   1120    unreg    0252-00-000-25    18-0024b5c61cf6-6244  C8A    3386      TEST   5881  10.10.5.16
10.11.9.130   1120    online   0252-00-000-30    18-0024b5c61076-6244  C8A    3354      ABC054 5881  10.10.5.15
10.11.9.118   1120    online   0252-00-000-18    18-0024b5c616b9-6244  C8A    3345      ABC033 5881  10.10.5.15
The same information is available from the Signaling Server with the command: isetShow
Automatic load sharing distributes the registration of IP sets between Signaling Servers.
If necessary, enter loadBalance to balance the number of IP sets on each server.