Devialet EQ with REW
Devialets recent software release for Expert Pro (Firmware 13.2.0 - DOS.2.2.6) adds a new feature called Sweet Room: a room correction module using a nine-band parametric equalizer. Unfortunately setup is totally manual, but the results can be very good.
The screen shots below are all Mac, I'm a Mac guy, but REW is also available for Windows, and Notepad will edit the text files.


Disclaimer! I am NOT an expert. These are notes, and not a tutorial 😊
- Plug in your UMIK-1 and open Room EQ Wizard (REW).
Follow the prompts about using the mic, import the calibration file etc.
- Click Generator from the main screen, and Save to file a WAV sweep file.
'Add Timing Ref' should be checked; it's required to start/stop measuring.
- Tag the sweep file (so you can find it), and move it to your Roon library (I use Metadatics for tagging).
- Click Measure from the main screen (top left), and press Start
Your sweep file should be already queued in Roon, press play!

There are start and stop (Timing Ref) tones at the beginning and end of the sweep to automate the measurement.
Adjust amp volume and repeat if the level is too low. If you hear your PC, turn it down!
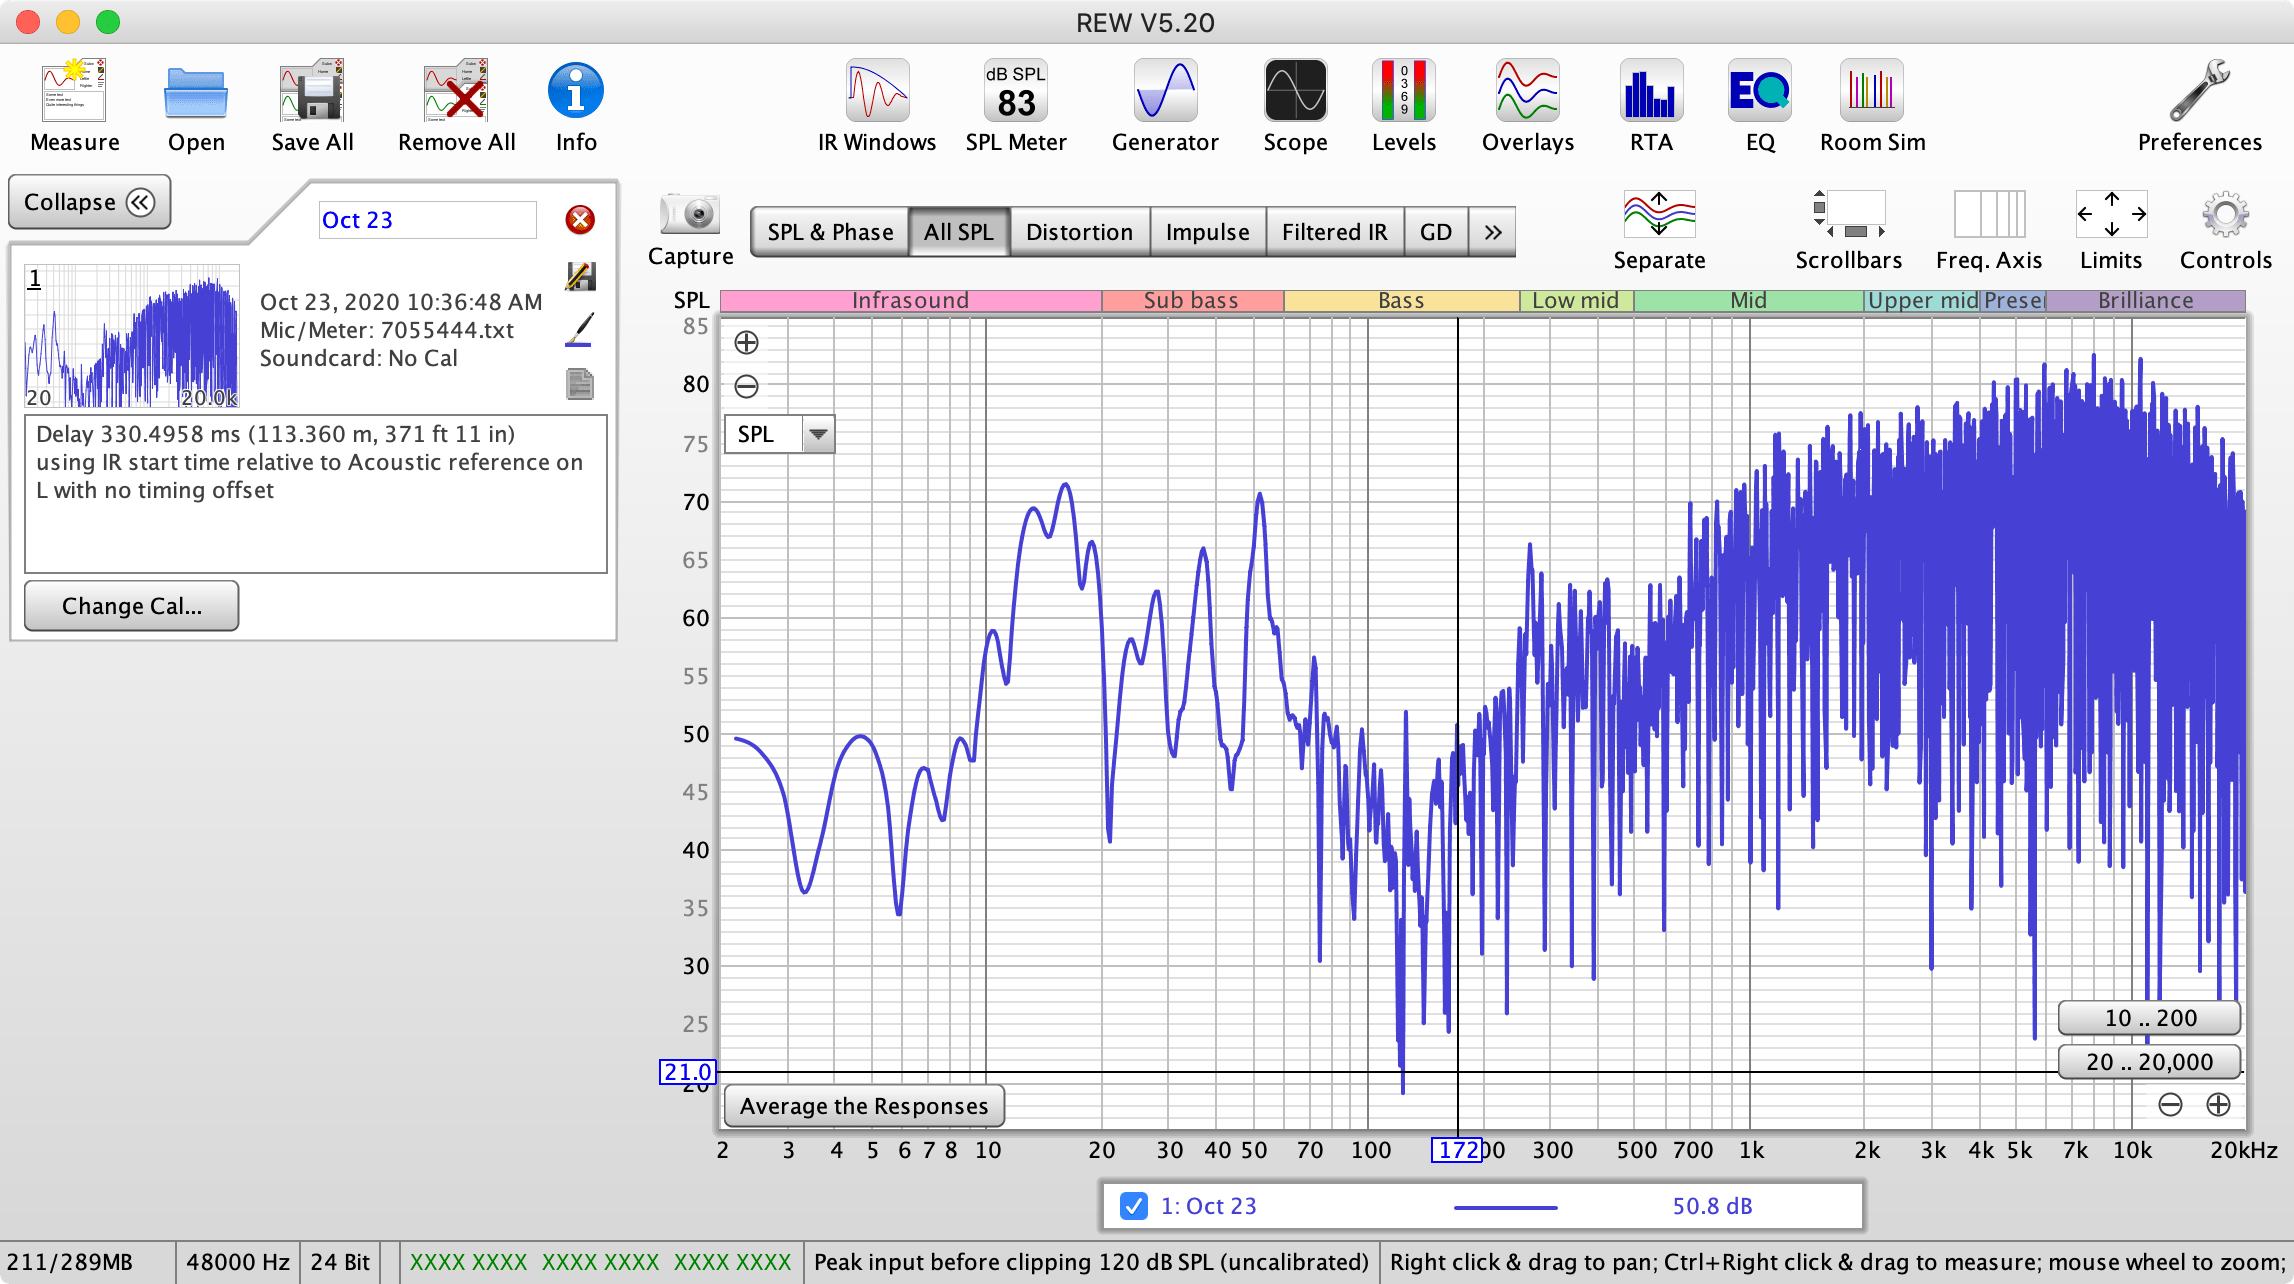
You should obtain a nice sweep, which will look something like this:
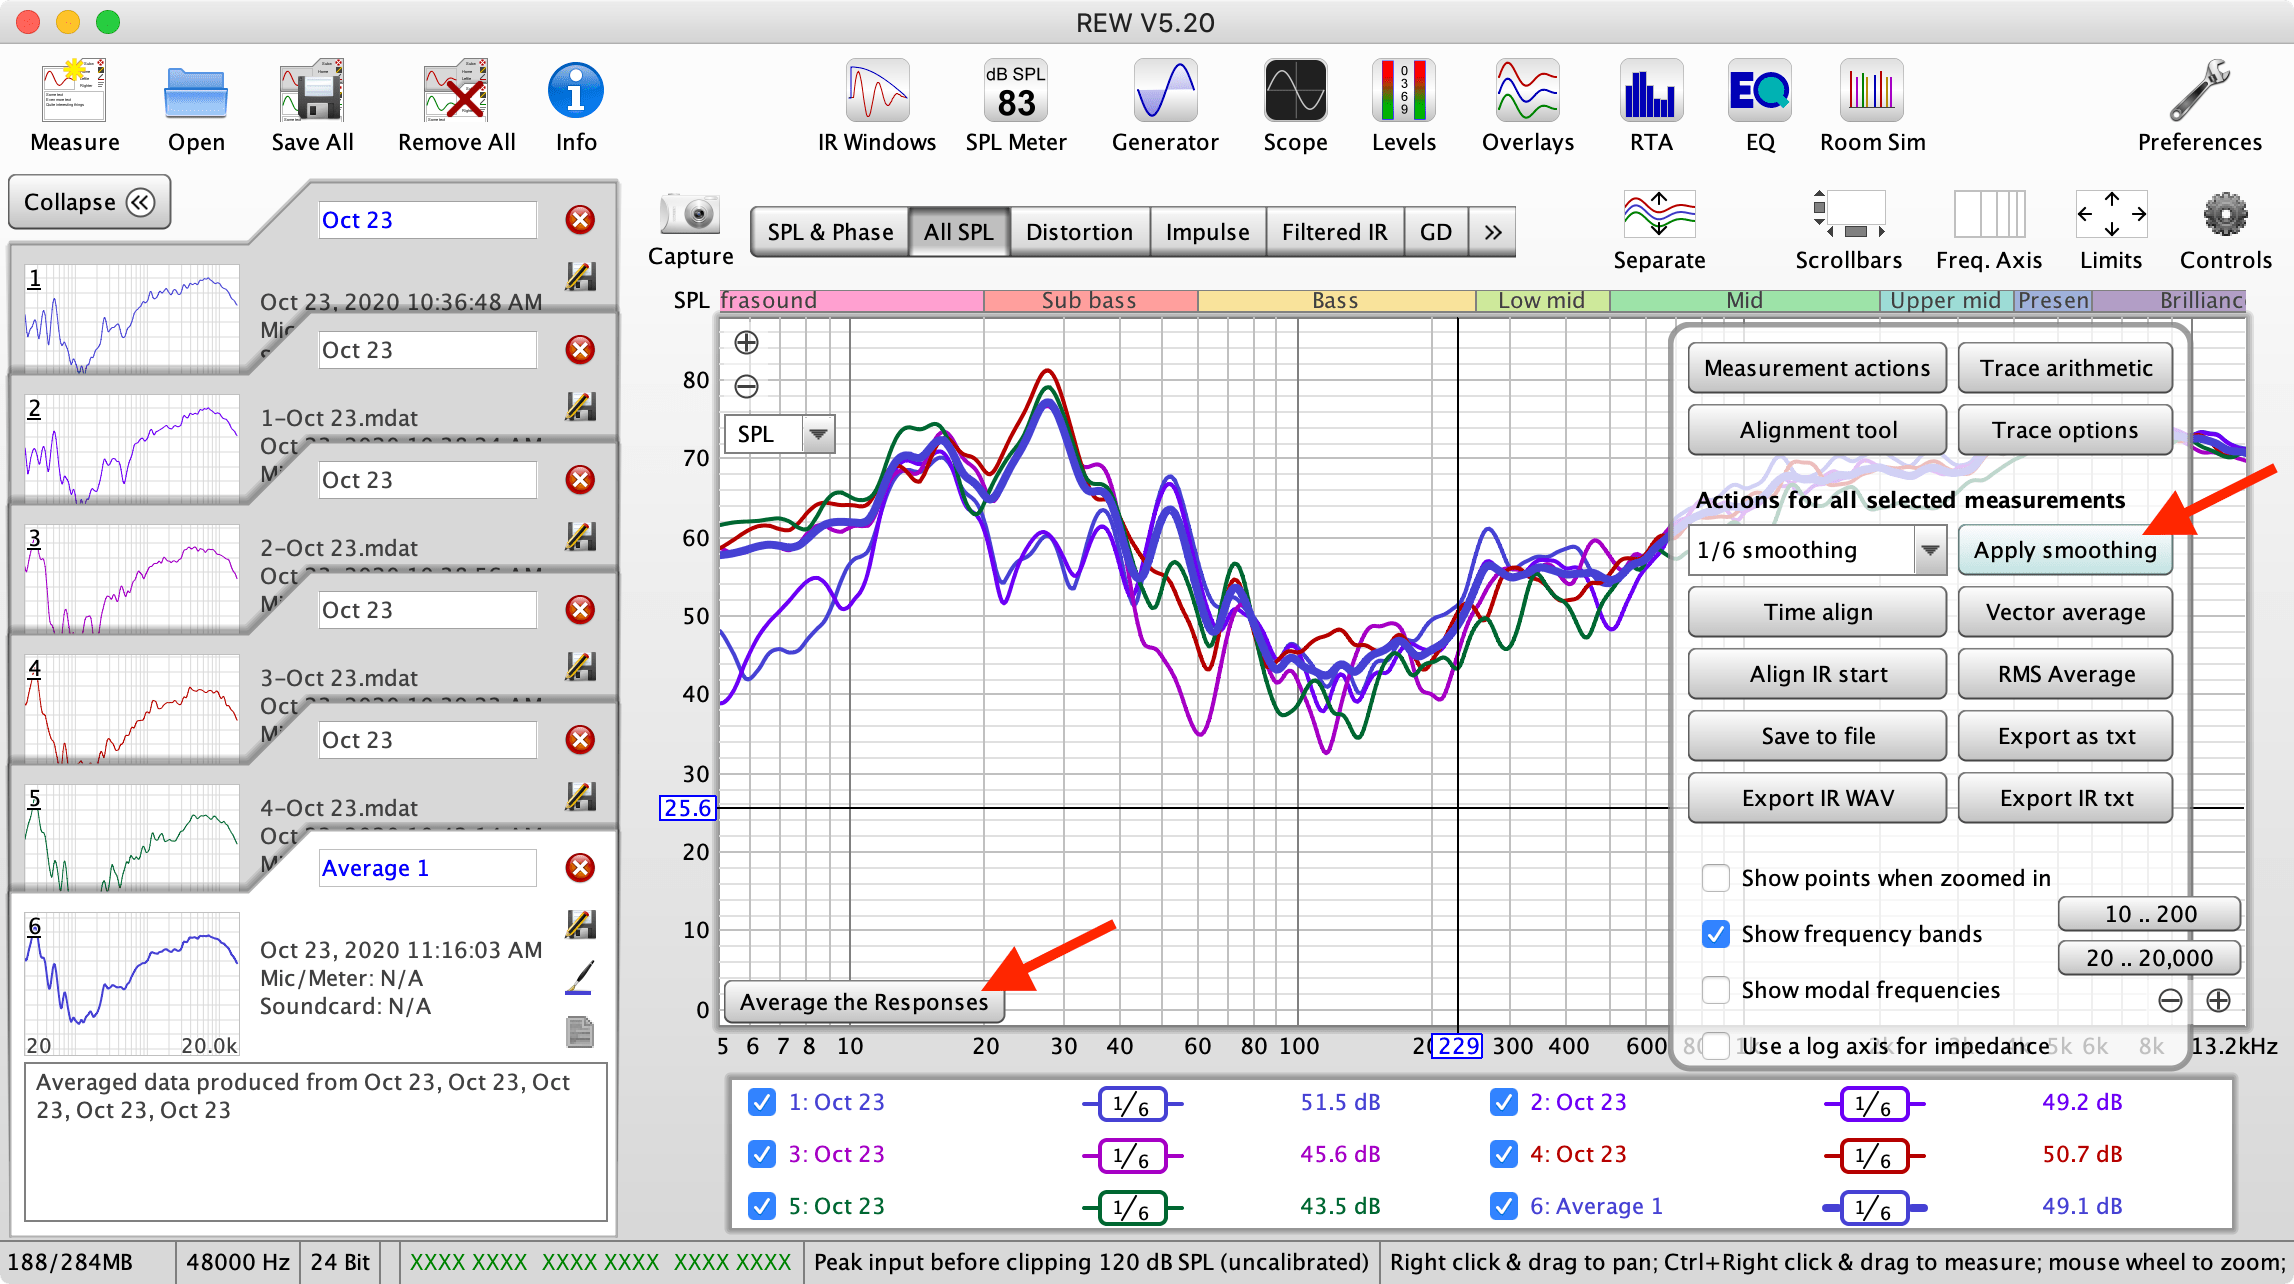
You can make several measurements (moving the mic around), and Average the Responses, but its not necessary.
- Click Controls, select 1/6 Smoothing, click Apply Smoothing. Here, there are 5 measurements averaged:
- Click the top EQ button from the main screen, the EQ for measurement... window opens.
Click the 4 arrows (top right), and then Fit to Data to expand the graph:
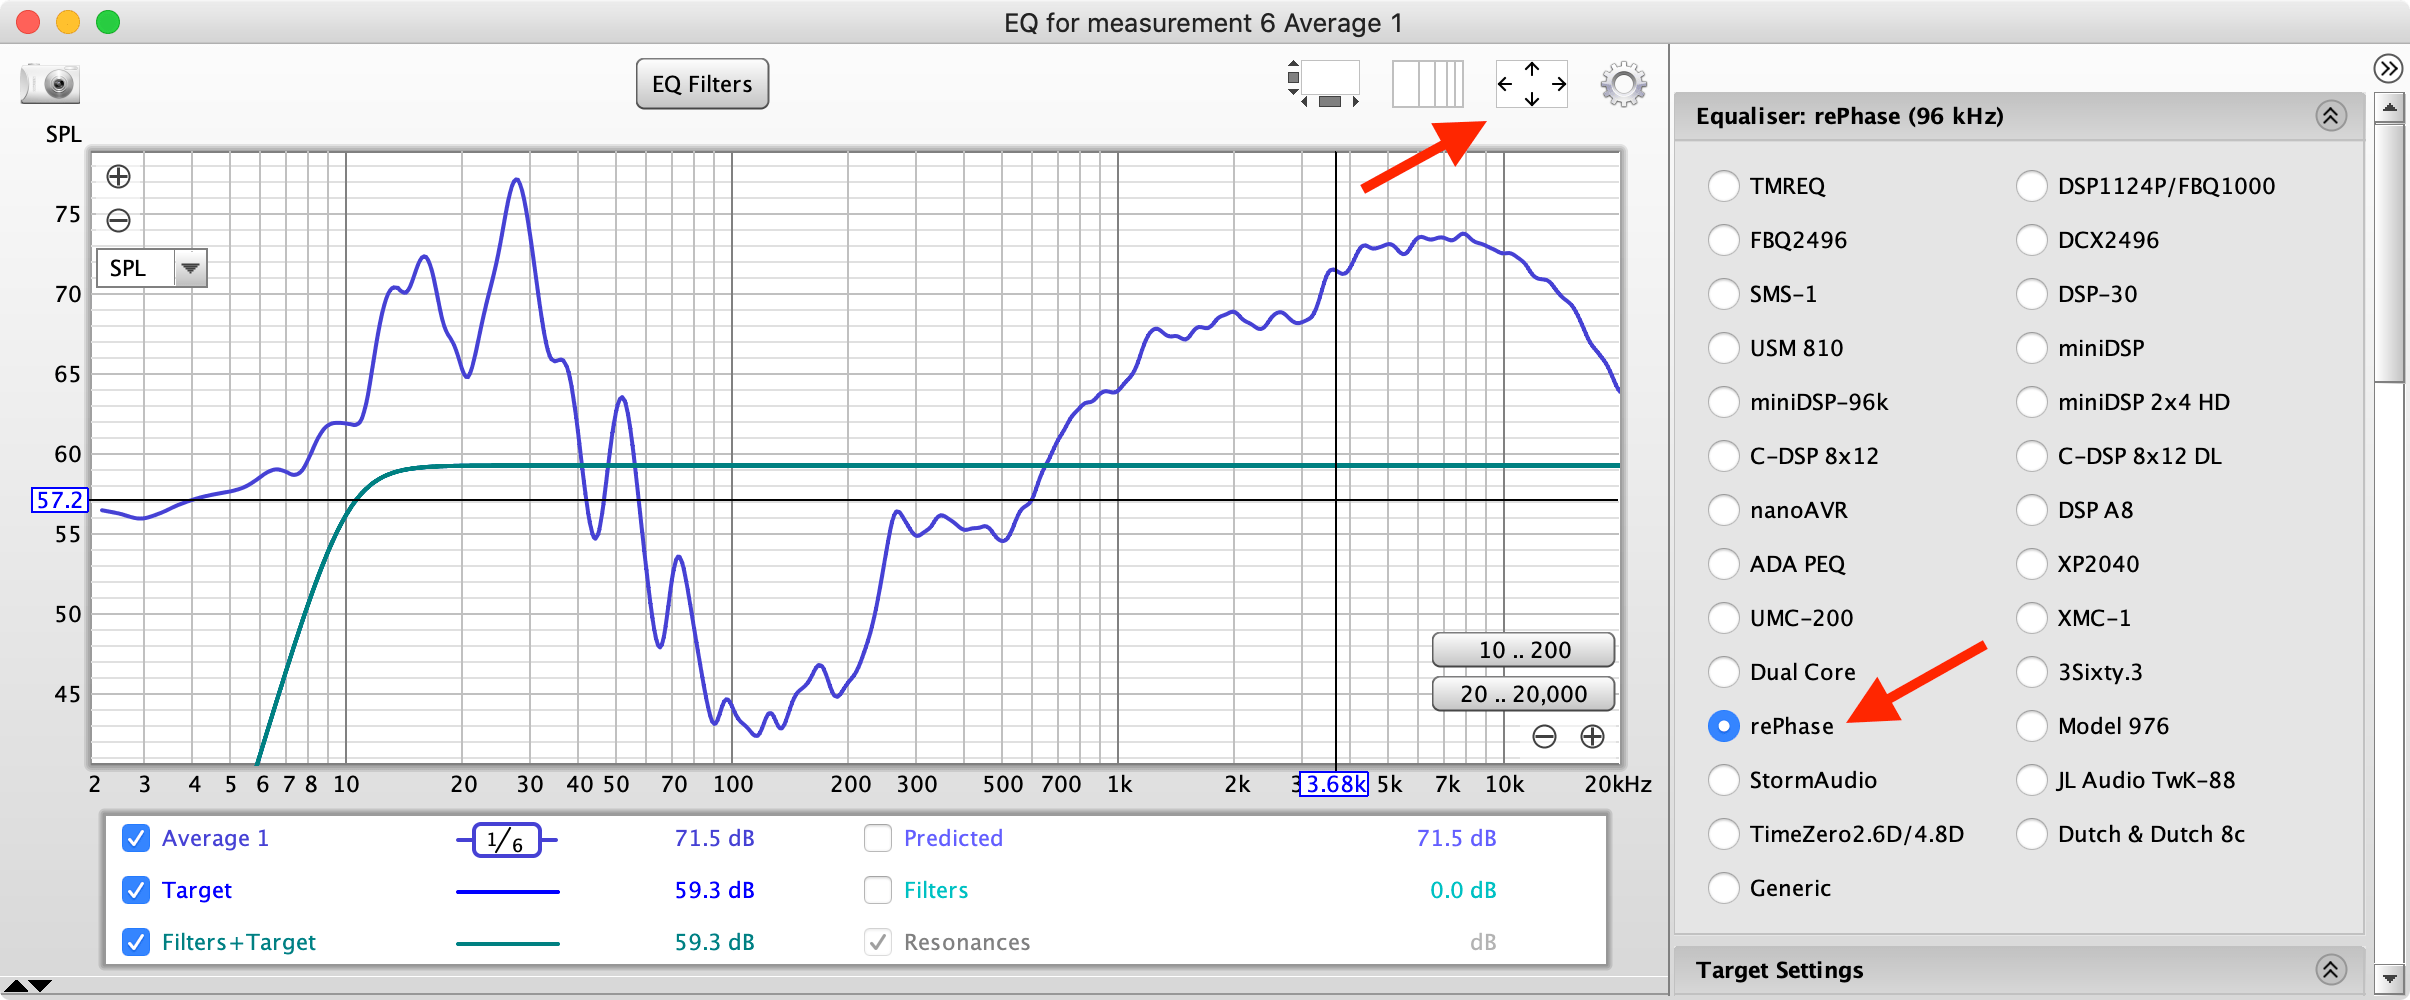
- There are a lot of settings in here! You may have to click the top right arrows to open the settings, click a tab to expand it.
a. Equalizer tab: rePhase
The Equaliser Selection selects which response REW is to model. You are free to experiment, but Mathieu PERNOT (Devialet) has confirmed, rePhase is the correct match. An Expert Pro has nine filters, so select (check) 9 filters under the EQ Filters button.

b. Target Settings tab: Type = Full range speaker, LF cutoff = 10, LF slope = 24 db/octave
- If you have a Room Curve, add it in Target Settings, if not, don't worry!
c. Filter Tasks tab: Match Range To: 20 - 20000 Hz, Individual Max Boost: 3db, Overall Max Boost: 0, Flatness Target: 3db
d. Modal Analysis tab: enter your approximate room dimensions!
- Go back to the Target Settings tab, click Calculate target level from response
- Go back to the Filter Tasks tab, click Match Response to Target - the magic happens, based on your settings!

Click the top Cog wheel to change the view settings, eg: check fill filter responses, and/or invert filter responses to see how closely it matches your measurement curve. The lower Waterfall (not shown) displays the new calculated impulse response curve.
Note that good EQ results are rarely obtained by adding positive gain, the (significant) dip at 115Hz is best left uncompensated.
- Click EQ Filters and you will see your numbers! Nine filters are enabled, but here only 7 were utilised:

- Back in the Filter Tasks tab, click Export Filter Settings as Text and save it. We're now finished with REW.
We can come back later and fine-tune the various tab settings, average several measurements, or make separate measurements for left and right channels, but for now we'll continue with these results and use the EQ filters for both (L+R) Devialet channels.
- Open your REW EQ Filter text file in an editor, I use BBEdit which has a free mode. It's important to use a 'plain text editor'.

As you can guess, the REW filter file looks nothing like a Devialet EQ file, so it will need some editing!
- With some 'Find/Replace' dexterity, edit the text file so it ends up in the Devialet format.
- Replace
Filter 1: ON PEQ Fcwith"EQ_1_L":[, and so on... - Replace
Hz Gainwith, - Replace
dB Qwith, - Add
],at the end of each line - Optionally, remove any insignificant zeros's
It should end up looking something like this:

- Replace
- Copy/paste the whole block to duplicate it, and change L to R in the new block, so that left and right settings are identical.

Make sure the lines are numbered 1 thru 9 for left (L), and 1 thru 9 for right (R), eg:
"EQ_9_R"
If we had made separate measurements for left and right channels, L and R numbers will be different. - Add the other bits, and you should have a working
eq.txtfile:- Add
"NAME":"EQ", - Add
"dB_GAIN_L":"0.0", - Add
"dB_GAIN_R":"0.0",
Any syntax errors will prevent the filter(s) from working, so check, and check again!

Stay within the Devialet EQ Limits: Frequency: 0 to 20000 Hz , Gain: -12 to +12 dB , Quality: must be positive.
If adding a positive gain (not recommended), it's necessary to reducedB_GAINby the same amount to avoid clipping.When it all looks good, save the file as
eq.txt - Add
- Copy
eq.txtto the root of your Devialet SD card, or both SD cards if you have a 'dual mono' setup. - Power cycle the Devialet. Long press the Tone button, and confirm EQ is shown next to DSPM; your file is accepted and applied.
 Without EQ
→
Without EQ
→ With EQ Active
- Perform some listening tests! Finally, the fun part!
After all this effort, you might be a little disappointed! We've flattened the curve, but a flat curve is a dull curve. This is why Room Curve correction is often added to liven things up again, eg, a slight boost to higher frequencies, depending on room.
I always found my room to be a little too bright, as the measurement above shows, and EQ can definitely fix that!
It's certainly worth spending a little bit of time with this, and I'm happy with the results - thank you Devialet!
Templates
Use the following templates. Enter or paste your comma separated values (freq, gain, Q) between the square [] brackets.
For example:"EQ_1_L":[0.0, 0.0, 0.0],becomes:"EQ_1_L":[27.5, -12, 10.78],etc.
Simple:
When you're happy with your results, this is the file to use.
Treble and bass can be adjusted normally using the remotes Tone button.
// Name for this EQ configuration
"NAME":"EQ",

// Parameters for left channel
// Static dB gain for the left channel
"dB_GAIN_L":"0.0",		// main gain

// Peak/Notch filters for the left channel (main)
// syntax:"EQ_x_L":[Frequency, dB_gain, Q_factor]
"EQ_1_L":[0.0, 0.0, 0.0],
"EQ_2_L":[0.0, 0.0, 0.0],
"EQ_3_L":[0.0, 0.0, 0.0],
"EQ_4_L":[0.0, 0.0, 0.0],
"EQ_4_L":[0.0, 0.0, 0.0],
"EQ_6_L":[0.0, 0.0, 0.0],
"EQ_7_L":[0.0, 0.0, 0.0],
"EQ_8_L":[0.0, 0.0, 0.0],
"EQ_9_L":[0.0, 0.0, 0.0],

// Parameters for right channel
// Static dB gain for the right channel
"dB_GAIN_R":"0.0",		// main gain

// Peak/Notch filters for the right channel (main)
// syntax:"EQ_x_R":[Frequency, dB_gain, Q_factor]
"EQ_1_R":[0.0, 0.0, 0.0],
"EQ_2_R":[0.0, 0.0, 0.0],
"EQ_3_R":[0.0, 0.0, 0.0],
"EQ_4_R":[0.0, 0.0, 0.0],
"EQ_5_R":[0.0, 0.0, 0.0],
"EQ_6_R":[0.0, 0.0, 0.0],
"EQ_7_R":[0.0, 0.0, 0.0],
"EQ_8_R":[0.0, 0.0, 0.0],
"EQ_9_R":[0.0, 0.0, 0.0],
Advanced:
Use the remote TONE button to change between configs.
Tip: Leave the L_ALT and R_ALT config as zero's to compare with and without EQ. Note, this configuration inhibits treble, bass and SAM adjustment, so you would probably only use it during testing (a dual mono 'companion' won't currently switch, requires firmware fix).
 // Name for this EQ configuration
"NAME":"EQ",

// Remote indicator
// Allow for the bottom's right button to toggle between main and alternate set of EQs
// Useful in A/B tests or during fine EQ tuning
"REMOTE",

// Parameters for left channel
// Static dB gain for the left channel
"dB_GAIN_L":"0.0",		// main gain
"dB_GAIN_L_ALT":"0.0",		// alternate gain

// Peak/Notch filters for the left channel (main)
// syntax:"EQ_x_L":[Frequency, dB_gain, Q_factor]
"EQ_1_L":[0.0, 0.0, 0.0],
"EQ_2_L":[0.0, 0.0, 0.0],
"EQ_3_L":[0.0, 0.0, 0.0],
"EQ_4_L":[0.0, 0.0, 0.0],
"EQ_5_L":[0.0, 0.0, 0.0],
"EQ_6_L":[0.0, 0.0, 0.0],
"EQ_7_L":[0.0, 0.0, 0.0],
"EQ_8_L":[0.0, 0.0, 0.0],
"EQ_9_L":[0.0, 0.0, 0.0],

// Peak/Notch filters for the left channel (alternate)
// syntax:"EQ_x_L_ALT":[Frequency, dB_gain, Q_factor]
"EQ_1_L_ALT":[0.0, 0.0, 0.0],
"EQ_2_L_ALT":[0.0, 0.0, 0.0],
"EQ_3_L_ALT":[0.0, 0.0, 0.0],
"EQ_4_L_ALT":[0.0, 0.0, 0.0],
"EQ_5_L_ALT":[0.0, 0.0, 0.0],
"EQ_6_L_ALT":[0.0, 0.0, 0.0],
"EQ_7_L_ALT":[0.0, 0.0, 0.0],
"EQ_8_L_ALT":[0.0, 0.0, 0.0],
"EQ_9_L_ALT":[0.0, 0.0, 0.0],

// Parameters for right channel
// Static dB gain for the right channel
"dB_GAIN_R":"0.0",		// main gain
"dB_GAIN_R_ALT":"0.0",		// alternate gain

// Peak/Notch filters for the right channel (main)
// syntax:"EQ_x_R":[Frequency, dB_gain, Q_factor]
"EQ_1_R":[0.0, 0.0, 0.0],
"EQ_2_R":[0.0, 0.0, 0.0],
"EQ_3_R":[0.0, 0.0, 0.0],
"EQ_4_R":[0.0, 0.0, 0.0],
"EQ_5_R":[0.0, 0.0, 0.0],
"EQ_6_R":[0.0, 0.0, 0.0],
"EQ_7_R":[0.0, 0.0, 0.0],
"EQ_8_R":[0.0, 0.0, 0.0],
"EQ_9_R":[0.0, 0.0, 0.0],

// Peak/Notch filters for the right channel (alternate)
// syntax:"EQ_x_R_ALT":[Frequency, dB_gain, Q_factor]
"EQ_1_R_ALT":[0.0, 0.0, 0.0],
"EQ_2_R_ALT":[0.0, 0.0, 0.0],
"EQ_3_R_ALT":[0.0, 0.0, 0.0],
"EQ_4_R_ALT":[0.0, 0.0, 0.0],
"EQ_5_R_ALT":[0.0, 0.0, 0.0],
"EQ_6_R_ALT":[0.0, 0.0, 0.0],
"EQ_7_R_ALT":[0.0, 0.0, 0.0],
"EQ_8_R_ALT":[0.0, 0.0, 0.0],
"EQ_9_R_ALT":[0.0, 0.0, 0.0],