Configuring an MRV
The MRV provides IP (network) access to serial COM ports, such as PBX Core or MGC TTY's. In a PBX environment, the network side is generally connected to the ELAN data switch - however, before doing this, the MRV needs to be configured.
Username/password defaults:
The following username and passwords are the defaults:
- The default login username is InReach (with a capital I and R).
The default login password is access. - To enter the "superuser" mode, type enable at the
InReach>prompt.
The default superuser password is system.
If the superuser password is not known, the MRV will need to be reset to factory defaults (from the ppciboot Main menu).
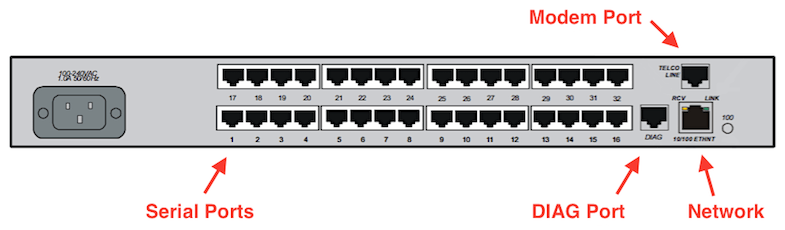
MRV ports:
First-time configuration:
1. Connect a terminal to the DIAG Port (port 0) - 9600,8,N, Xon/Xoff (or NONE).
2. The "Main Menu" displays, and the unit starts loading after 8 seconds.
3. "... would you like to run Initial Connectivity Setup? y/n" displays. Press y (yes).
4. Enter the Superuser password: system. The "Quick Configuration" menu displays:
Quick Configuration menu

1 Unit IP address
2 Subnet mask
3 Default Gateway
4 Domain Name Server
5 Domain Name Suffix
6 Cluster Secret
7 Superuser Password
8 Exit and Save

Enter your choice:
5. Enter the appropriate values for IP address, Subnet mask, and Gateway. Press 8 to Exit and Save.
CONFIGURATION SUMMARY

1 Unit IP address	10.10.10.17
2 Subnet mask 		255.255.255.0
3 Default Gateway 	10.10.10.254
4 Domain Name Server
5 Domain Name Suffix
6 Cluster Secret
7 Superuser Password	Not Changed
8 Exit and Save

Is this information correct? (y/n): y
Note: Setting Unit, Subnet, and Gateway IP addresses to 0.0.0.0 (default) enables DHCP mode.
6. Press y, then Save the configuration to flash memory.
7. Press Enter several times to display the Login: prompt. The default login name is InReach, the default password is access
8. Enter the following commands at the InReach (password: system) command prompt:
InReach:0 >enable
Password: system
InReach:0 >>config port async 1-16 speed 9600
InReach:0 >>config port async 1-16 no autohangup
InReach:0 >>config port async 1-16 no authentication
InReach:0 >>config port async 1-16 no authentication outbound
InReach:0 >>save config flash
..........
InReach:0 >>
Note: At the InReach:0 >> (SU) prompt, type setup to re-run the setup utility, eg: to change IP addresses, at any time.
Accessing and Configuring the GUI:
To perform this procedure, you need a PC with Java Runtime Environment (JRE) 1.4.2 or later installed. A suitable Java installer is on the supplied CD. You must also have correctly programmed the MRV with the correct IP adresses (as above) before hand.
- In a browser window, type the IP address of your LX-4000T
unit. The LX-Series Console Access page displays.

- Click on the Launch Secure Console button.
- If Java is correctly installed, a Security Warning window displays:

- Accept the Security prompt. The Security Warning window closes.
- Enter your Username and Password, and click Login.
The defaults are username: InReach and password: access.
Using Web Configure Mode:
- If you log in as a "user", the following window displays:
- To log in as a "superuser", click the Admin button on the toolbar and enter the default Superuser password: system.
You can now configure the unit via the GUI. - Click on the menu items on the left side of the window.
For example, selecting Ports: Async opens the Async ports window.
- Configure the Async ports as required.
- Connect the (PBX) TTY's with the special RJ-45 to DB-9 cables, and test.
The MRV is a DTE device, so some null modem adapters maybe required.
To connect to a serial port:
Serial Ports are assigned Telnet port numbers 2100-6800, and SSH port numbers 2122-6822, by default.
| Port #: | 1 | 2 | 3 | 4 | 5 | 6 | 7 | 8 | 9 | 10 | 11 | 12 | 13 | 14 | 15 | 16 | 17 | 18 | 19 | 20 | 21 | 22 | 23 | 24 | 25 | 26 | 27 | 28 | 29 | 30 | 31 | 32 | 33 | 34 | 35 | 36 | 37 | 38 | 39 | 40 | 41 | 42 | 43 | 44 | 45 | 46 | 47 | 48 |
|---|---|---|---|---|---|---|---|---|---|---|---|---|---|---|---|---|---|---|---|---|---|---|---|---|---|---|---|---|---|---|---|---|---|---|---|---|---|---|---|---|---|---|---|---|---|---|---|---|
| Telnet: | 2100 | 2200 | 2300 | 2400 | 2500 | 2600 | 2700 | 2800 | 2900 | 3000 | 3100 | 3200 | 3300 | 3400 | 3500 | 3600 | 3700 | 3800 | 3900 | 4000 | 4100 | 4200 | 4300 | 4400 | 4500 | 4600 | 4700 | 4800 | 4900 | 5000 | 5100 | 5200 | 5300 | 5400 | 5500 | 5600 | 5700 | 5800 | 5900 | 6000 | 6100 | 6200 | 6300 | 6400 | 6500 | 6600 | 6700 | 6800 |
| SSH: | 2122 | 2222 | 2322 | 2422 | 2522 | 2622 | 2722 | 2822 | 2922 | 3022 | 3122 | 3222 | 3322 | 3422 | 3522 | 3622 | 3722 | 3822 | 3922 | 4022 | 4122 | 4222 | 4322 | 4422 | 4522 | 4622 | 4722 | 4822 | 4922 | 5022 | 5122 | 5222 | 5322 | 5422 | 5522 | 5622 | 5722 | 5822 | 5922 | 6022 | 6122 | 6222 | 6322 | 6422 | 6522 | 6622 | 6722 | 6822 |
Connect to a Serial Port device by using the MRV-IP address followed by a port number:
> telnet 10.10.10.17 2100 ← to connect to MRV serial port #1
To access the CLI port from a terminal attached to a serial port:
- Press Return several times to autobaud (if autobaud is enabled) the port and get the Login: prompt.
- Enter your login name (default: InReach).
- Enter your password (default: access).
- The Superuser password (default: system).
Configuration Backup:
You'll need a TFTP server, such as PumpKIN, running on your network.
Telnet into your MRV, login as a Superuser, and issue the following command:
> save configuration network <filename> <ip>
A backup file will be placed in the TFTP servers root directory.
The Modem Port:
The modem port allows dial-in access. If present (factory option), connect a phone line to the modem's RJ11 connector.
The Modem port number is as follows:
- LX-4008M - port # 9
- LX-4016M - port # 17
- LX-4032M - port # 33
- LX-4048M - port # 49
At the InReach:0>> prompt, enter show port async 33 modem to display the LX-4032M modem port fields.