CS1000E Rls. 7.5 Installation
2. Configure and Join the Secure Domain

The most significant change in Release 7.5/7.6 is the requirement to deploy the Unified Communications Manager (UCM). The UCM creates a security "umbrella" where components and applications must first register in order to function in the system.
Once this security domain is established, and the elements are registered to it, only one password is required to access any individual element: called "single sign-on".
Release 7.5 requires Microsoft Internet Explorer v.6.02 with Java Runtime Environment (JRE) version 1.5 or higher. An alternative is Windows 7 with Internet Explorer 8 (set to IE7 Browser mode). Anything else, and you're on your own! It is always important to turn off browser caching and auto-complete. See Internet Explorer settings for details.
Always do your UCM configuration on the TLAN, Avaya recommends it, and it honestly works better. Register Linux elements on the TLAN, and VXWorks elements on the ELAN.
Base Element Access
Make sure you've updated the computer's hosts file (C:\Windows\System32\drivers\etc\) with the FQDN/IP address, unless using a DNS server. We must access the base elements in order to configure security. This can be done in two ways.
- Browse to the elements IP address
- Browse to the elements URL: FQDN/local-login
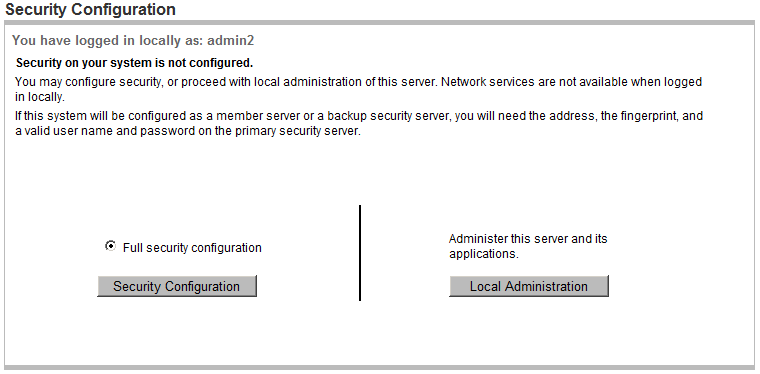
If you browse to the elements IP address, you will get its Local Login screen - login with the local user account: admin2.
After the security domain is established, access to the UCM is accomplished by navigating to https://FQDN. The elements are listed in the main window (show below), and local access is accomplished by clicking on the Element Name link.

For most systems, this initial step in the installation process is the only time the base element will ever be accessed directly.
Perform Security Configuration:
Every installation has one Primary Security Server (UCM0 or SS0).
You may optionally configure one Backup Security Server (UCM1 or SS1).
All other cards/servers, such as the MAS, are Member Servers.
For each element:
- Open a browser window, and enter the elements IP address in the address bar - login with admin2.
- On the left select Full security configuration, then click the Security Configuration button underneath.
- Click Next on following screen where changes can't be made to IP address and FQDN.
- Select a Server Type: Primary, Backup, or Member server
- Click Next.

For the Primary Security Server:
- Enter an Administrator password that meets complexity rules. Once the password is confirmed, click Next.
- On the Certificate Information screen, enter the information required to produce the certificate. Setting the Bit length: to 512 will speed up opening browser pages (with Rel. 7.6, the choice is 1024 or 2048 bits).
- Once filled in, click Finish.
- After a short pause (while the server is configured), Completed and the certificate fingerprint is displayed. If something went wrong with the configuration, you must either try again, or re-install from scratch. Note the last few digits.
- Click Restart.
For the Backup/Member Servers:
- Configuration is similar to above, but Backup/Member Servers will join the primary servers secure domain - therefore the certificate is imported and not generated on these elements after entering the secure password. If you changed the bit length on the primary (eg, to 512), make sure you match the setting here.
Local Administration:
The following configuration changes are performed on each server under Local Administration:
- Base System > Networking > DNS and Hosts - add the other cards
- Base System > Networking > Route Table - if required, not shown here
- Base System > Date and Time > edit clock source
Open UCM, https://FQDN, then from the main UCM Elements screen click on the primary security server base element:
DNS and Hosts:
- Navigate to Base System/Networking/DNS and Hosts
- Click Add... in the Hosts section.
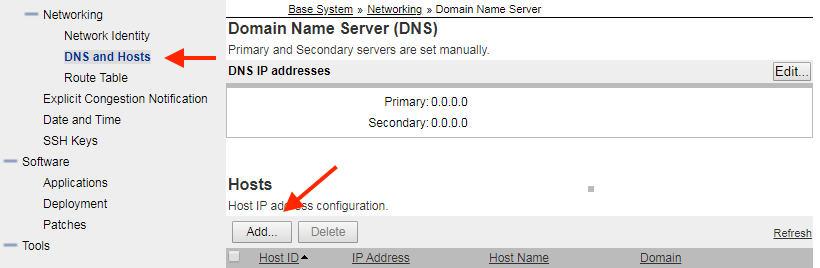
- Add an entry for each other linux-base card on this system.
eg, on SS0, add SS1 and MAS. On SS1, add SS0 and MAS. On MAS, add SS0 and SS1.
Set the clock source:
- Navigate to Base System/Date and Time
- Click Edit... in the Network Time Protocol section.
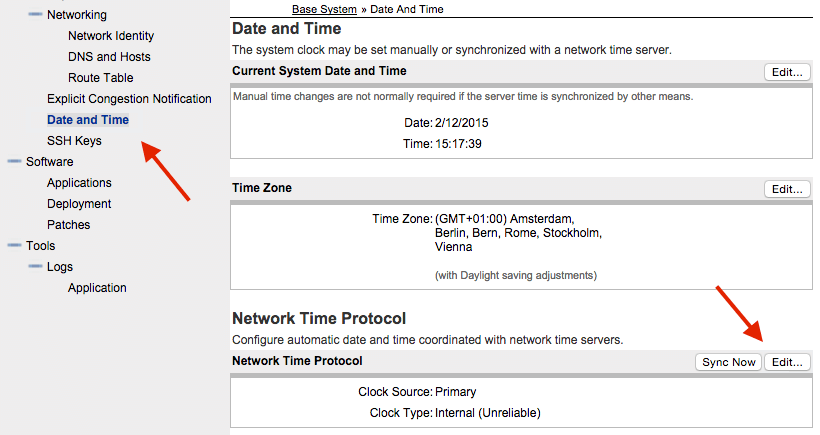
- Set the Clock Source to an NTP server type of Not a clock server, and enter the IP address of the CS1K.
- Click Save.
You may prefer to Set the Time with NTP.
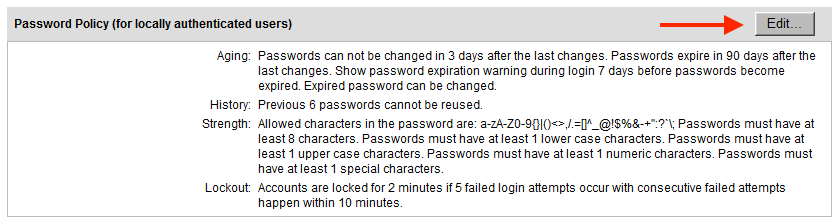
Modify security policy:
This step is optional. We will simplify security policy and change the default password to something easy.
- Navigate to Security/Policies.
- Click Edit... next to Password Policy.
- Deselect Aging, History, Strength, and Lockout.
- Edit the Session Properties to have more time for a session or to modify the allowable amount of idle time.
- Edit Security Settings to change the Login Warning Banner
- Navigate to User Services/Password on the left and change the password to something easy to enter and remember.
Remember to reinstitute good password practices once configuration is complete.
Install security certificate on PC:
Until now each time a new browser window is opened to access UCM a certificate warning must be acknowledged. To overcome this, download and install the certificate. Depending on the operating system and version of Internet Explorer, you may need to add the FQDN to the list of trusted sites.
- Navigate to Security/Certificates, and click on the Private Certificate Authority tab.
- In the center of the screen click Download.

- Click Open on the download popup box.
- If a Certificate popup box appears, click Install Certificate...
Alternatively, navigate to the downloaded certificate, right click it, and choose Install Certificate. - In the Certificate Import Wizard window press Next.
- Select, Place all certificates in the following store.
- Click Browse... select Trusted Root Certificate Authorities and click OK.
- Click Finish. If a Security Warning popup box appears, click Yes.
When complete, close Internet Explorer, open another IE window, navigate to UCM and see if the certificate import worked.