CPDC HD replacement
The following details HD/SSD replacement/upgrade steps for 7.5/7.6 CPDC signalling servers on a working system.
There are several steps! In addition to this list, use the Load CPDC Checklist to keep track of your progress.
Make sure you have software, patches, an NRS backup, IP assignments, and passwords before starting.
You can identify the current drive from the CLI with: hdparm -I /dev/sda (root user only)
- if logged in as admin2, su root, enter root passwrod, then /sbin/hdparm -I /dev/sda
Note: IP phones will be out of service for the duration, approx. 3 hours (assuming all goes to plan).
- Backup the NRS, if possible, and find software, patches, IP adresses and IP phone firmware files.
- note how many IP phones are registered (stat iset all), and the firmware versions.
- on ss0, enterbaseparamsconfigto record the IP addresses and FQDN. - LD 117:
unreg u s - Connect to ss0 and ss1 tty ports with a direct serial cable, or telnet into MRV ports (2100 = port 1, 2200 = port 2, etc)
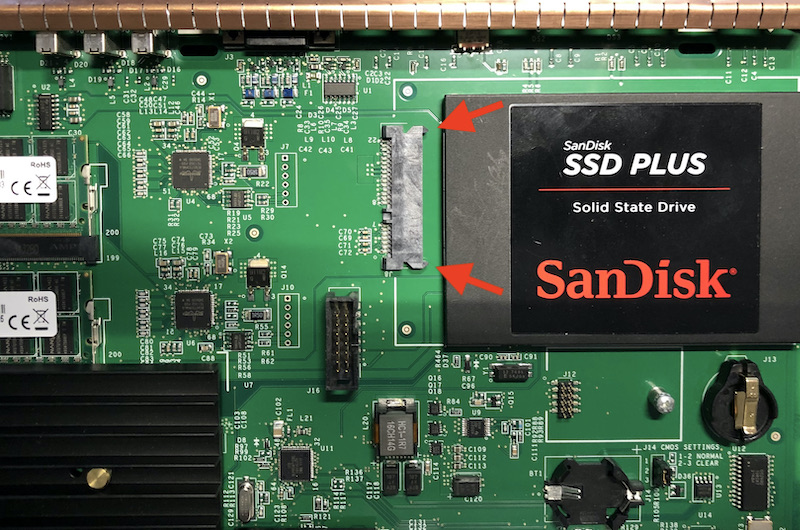
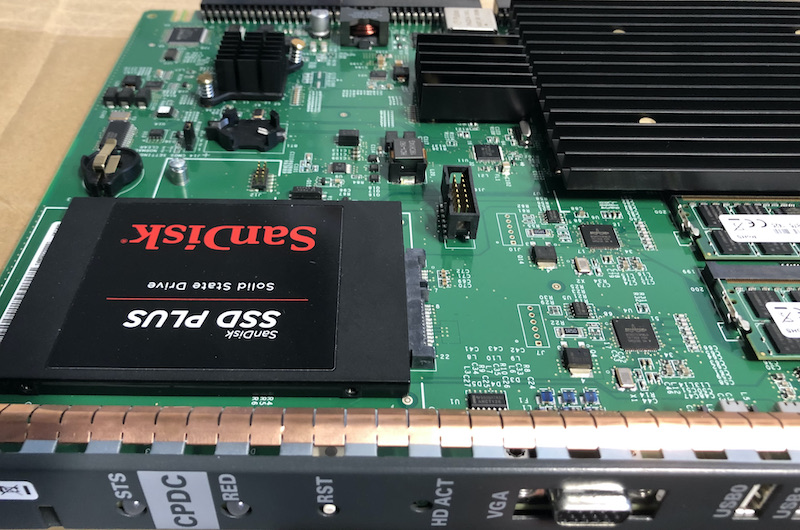
- the following can only be performed from a serial tty port. - Remove ss0 CPDC, and replace the hard drive.
- Fit a 2.5" SATA hard drive (min. 160GB) to the CPDC card. A 250GB (or larger) SSD is recommended.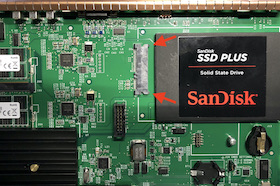
Align and seat drive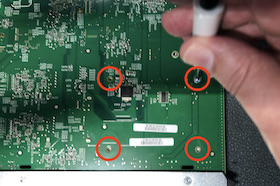
4 screws on underside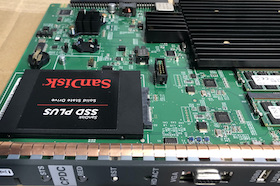
SATA drive in place - Re-seat card, and boot from installation USB drive (press f for boot manager).
- choose option 1 to install software
- enter ELAN IP / netmask / Gateway / TLAN / etc...
- set timezone, etc...
- only ss0 is a deployment server - Login as root:
passwd root -x -1/passwd admin2 -x -1
- if you logged in as admin2, you cansu root-- Repeat steps 4 to 6 for ss1 --
- Build route to gateway, if required.
- local administration → route table → add → network x.x.0.0 (gw x.x.x.254), netmask 255.255.0.0, uncheck host route
- Security config: ss0 = primary / ss1 = secondary
- Primary: enter certificate information, press Finish ONCE!
- Secondary: backup security server, so JOIN the primary - Log in to call server (admin2/0000), LD 117:
reg u cs... - Telnet/login to each MGC (admin2/0000), and:
joinSecDomain
- can be done from the sig server CLI - Software Deployment: Software Loads ➤ Deployment - upload the NAI file (can also be added via USB)
- Software Deployment: Add CS1000 EM & SS (Systems), add NRS (Services), Commit and Deploy.
- Upload, load and install patches, and Service Pack. Install the patches in the correct order.
- 3 patches (4 for 7.6):/var/opt/nortel/patch-ploadeach, thenpins(pstat).
- the Service Pack:/var/opt/nortel/patch/sp-spload,spins(spstat).# Release 7.5 Release 7.6 1 linuxBase... linuxBase... 2 baseWeb... Jboss-Quantum... 3 patchWeb... patchWeb... 4 dmWeb... - Reboot both servers after applying the service pack.
- In Element manager, IP Network ➤ Nodes: Servers, Media Cards
- click NODE Synchronised, then Start Sync, then Restart ApplicationsAt this point, IP phones should start to register, except we want to quickly avoid a firmware mismatch:
- Software ➤ IP Phone firmware ➤ upload the firmware for each phone type.
(confirm both signalling servers are shown) - hit UPDATE to apply it.
Repeat for each IP phone type. - Log into the Call Server,
stat iset allto check if the IP phones are registering, note the firmware.
Be patient! If there's been a firmware change, it can take a while. Make sure the DHCP server is online.If the phone's don't register,
baseparamsconfigon each sig server to check the gateway IP addresses! - Personal Directories ➤ Server configuration ➤ add server address: ELAN IP of SS0
- Phones ➤ Retrieve ➤ Click 'All phones and reconcile', Submit
- NRS: Restore the DB backup to the Primary, Cutover/Commit, Enable and Restart Applications.
- on Secondary, enter host name (ss0), server ip's, change the 'Server Role', Cutover and Restart Applications.
- if successful, the database is automatically synchronized (may take a few mins). - Security/Policies ➤ Password Policy, click Edit... Deselect Aging, History, Strength, and Lockout.
- Optionally, install the IE certificate: Security ➤ Certificates - Private Certificate Authority tab ➤ Download
Place it in 'Trusted Root Certification Authorities', and restart IE. Login in, and the red bar should be gone! - LD 43:
EDD, then it's Miller Time.

UNREG U CS → LD 43:EDD → LD 135:INI BOTH → LD 117:REG U CS → Element Manager: Sync Node