Programming Target Lines
A 'Target Line' is the way to make Norstar Direct Inward Dialing (DID) work.
A Target Line is assigned to a phone, and 'rings' when the received digits match.
- Enter programming: Press Feature**CONFIG, password: CONFIG
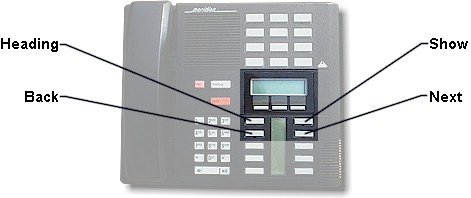
- Use Back and Next to scroll items, Show to drill down a level, Heading to go up a level:
- Scroll to and select Lines
- At Show line:___ , enter the E&M trunk line number and select the line
- When Trunk Type:E&M is displayed, scroll to Ans mode: and change it to Auto
- Scroll to Ans with DISA:N, make sure that it's N for no.
- Scroll back to the main level, Lines should be displayed
- Scroll back to the Terminals&Sets menu
- Enter one of the set’s DN numbers at the Show set:___ (not the prime set 221)
- Press Show and go to the Line Access/Line Assignment menu of that set.
- At Show line:___, enter a number between 145 and 274 (these are target lines used to direct incoming calls to an assigned set). Keep track of these because each telephone that requires incoming calls must have a target line assigned to it.
Set Target Line Rec’d # 222 145 5551222 223 146 5551223 224 147... etc 5551224 - Change the assignment from Unassigned to Ring only
- Scroll back to the main menu, Terminals&Sets should be displayed
- Scroll forward to Lines once more, and at the Show line:___ enter the target line you assigned to the telephone in step 10.
- Select the line and select Trunk/Line data
- When you see Target line on the display, scroll to Line type:Public and press the CHANGE softkey.
- At the Private to:___ prompt, enter the set’s number from step 9.
- Scroll forward to the Rec’d #:None prompt and enter the incoming DID number.
- Press the Rls button when finished with Target Line configuration.
- Assign target lines as needed following steps 8 through 18.