Adding Licenses
License keys are required to enable IP Office features and applications, and must be added into the system's configuration.
Eg, an Essential Edition system license (for the s/w release) is required to enable an IP Office Essential Edition system.
The Avaya IP Office has two different versions of licenses:
- Old: ADI - IP Office versions 9.1 and below - distributed as an Excel file (Avaya Direct International)
- New: PLDS - IP Office versions 9.1 and above - distributed as an XML file (Product Licensing and Delivery System)
ADI licenses are cumulative: eg, adding a new license file (or code) will not remove or overwrite any previous applied licenses.
PLDS licenses contain all of the system licensing in one XML file. Replacing this file, replaces all licensing: any features not in the new XML file will be removed. Therefore, before uploading, open the file in a text editor and ensure that all relevant licenses are present.
The system serial number is printed on the System SD Card, prefixed with PLDS ID, FK SN or FK depending on the age of the card. It's also shown in the System configuration tab, under Dongle Serial Number in Manager. Newer cards have a 12-digit number, older cards have a 10-digit number. For PLDS licensing, use the 12-digit number, or prefix a 10-digit number with 11 to make it 12 digit.
Add an ADI License:
License keys are unique 32-character codes, based on the feature name and the Feature Key Dongle (System SD Card) serial number.
Licenses are distributed as an Excel file, which you will need to open. Confirm the serial number is correct, then Copy (ctrl-c) the Encrypted Key from the Excel Worksheet All Keys, and paste (ctrl-v) it into the Manager. Then Save the configuration change.
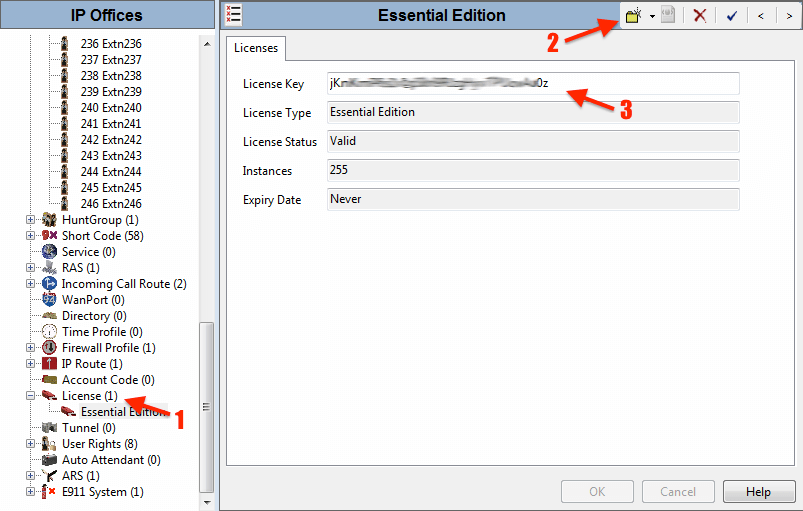
➤ To add a single ADI license:
- Open a configuration in Manager, and click the left License key icon

- Click the top-right folder icon
 to Add a license
- Paste (ctrl-v) in the license key (copied from Excel), and click OK
- Click the Save Config icon
 and close the window
- Re-open the configuration, and check the License Status is Valid.
➤ To add multiple ADI licenses:
- Select all encrypted keys in the Excel file, and Copy (ctrl-c).
- Open a configuration in Manager, and click the left License key icon
- Right-click the middle pane and select Paste (ctrl-v) - all ADI licenses should populate in the list.
- Click Save config . Close and re-open to check that the License Status is Valid.
➤ Add ADI license to system SD card:
If you have a lot of license keys to add, create a plain text file with one license key on each line. Name this file keys.txt, and copy it into the /system/primary folder on the System SD memory card.
If a license file called keys.txt is found in the /system/primary folder during boot time (IP500v2), the new licenses in that file will be merged with the configuration. This is also a good way to backup your license keys.
Each license can have a status of: Unknown, Valid, Invalid, Dormant, Obsolete, or Expired. You'll want your keys to be Valid!
Add a PLDS License:
➤ Add PLDS license in Manager:
- Open a configuration in Manager, and click the left License key icon
- Click Add. Select the XML file to be uploaded to the system, and press OK.
If no errors, the IP Office will respond that the licenses were added successfully. - Click Save config . Close and re-open to check that the License Status is Valid.
The XML file containing the systems PLDS licenses is stored on the System SD card. This file can be added to the system SD card prior to installation. The licenses are then automatically imported into the system configuration when the system is started.
➤ Add PLDS license to system SD card:
- Rename the supplied .XML license file to PLDSkeys.xml.
- Using a card reader, copy the file into the /system/primary folder on the System SD memory card.
Remember, this process REPLACES ALL previous licensing, so ensure the new XML file matches up (in a text editor) before applying it.
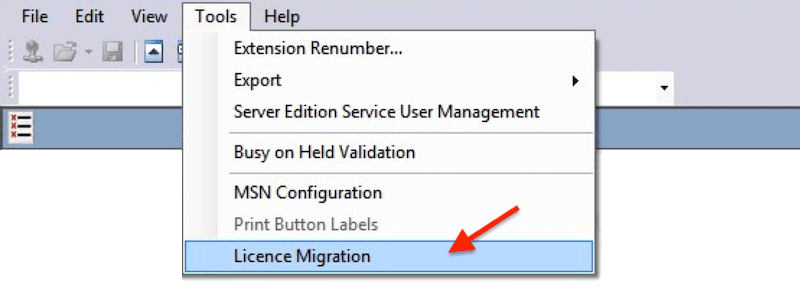
Migrating a License:
When requesting a new license for expansion or a new feature, provide the vendor with the current licensing information so it can be incorporated into the new license file. In the Manager (version 10 up), select Tools ➤ License Migration
The 'Save As' window opens, enter a filename, and click 'Save'. A .zip file is saved with the system details and licensing information: this .zip file is then forwarded to the vendor and used to create a new license file.
The .zip contains an XML file, which can be viewed (but not edited) in a text editor. The data has a digital signature for verification. Do NOT edit this file, as it will subsequently fail validation. The file is signed to prevent tampering.
The License Migration option can only be used with an online configuration, its disabled for offline configurations.