J179 Backgrounds
To set a custom background, we must SET the following:
| BACKGROUND_IMAGE | 320×240 jpg, less than 256KB. max. 5 filenames, comma separated eg: SET BACKGROUND_IMAGE "background1.jpg,background2.jpg" |
| BACKGROUND_IMAGE_DISPLAY | Filename of image to display as default |
| BACKGROUND_IMAGE_SELECTABLE | Allow user to change backgrounds: 1=yes, 0=no |
The custom image file(s) must be 320×240 jpegs (.jpg), and less than 256KB.
With IP Office, the 46xxsettings.txt file should always be auto-generated.
Therefore, create a text file 46xxspecials.txt as follows:
- Get an autogenerated file by opening: http://<ip_address>/46xxspecials.txt in a browser
- Copy/paste the text into notepad, and remove the 1st line containing AUTOGENERATED
Note, lines starting ## are comments, lines starting # are labels (used with GOTO) - Paste the following into the '# J1X9SPECIALS' section, and save the changes:
SET BACKGROUND_IMAGE background1.jpg
SET BACKGROUND_IMAGE_DISPLAY background1.jpg
SET BACKGROUND_IMAGE_SELECTABLE 1
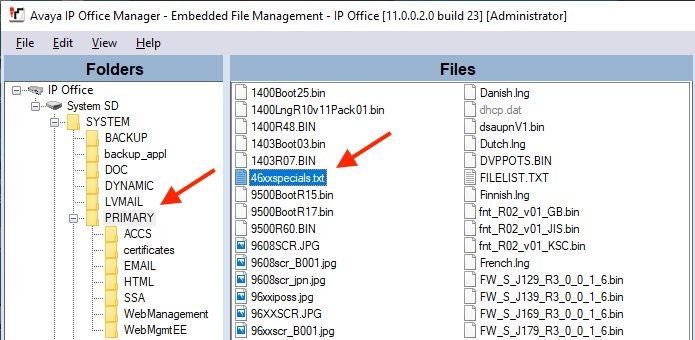
In IP Office Manager, goto: File ➤ Advanced ➤ Embedded File Management
Copy 46xxspecials.txt, and the .jpg image file(s), to the SYSTEM/PRIMARY folder.

The automatically generated '46xxsettings.txt' file will append 'GET 46xxspecials.txt' at the end.
Reboot (or power cycle) the phone, and hopefully the new configuration and background image will be applied.
Avaya Backgrounds:
Drag-drop an image to your desktop, right-click it and 'Save Image', or  download Avaya's complete collection of 73 images in color and grayscale. Source: Avaya.com. Note, it's not possible to change the text appearance.
.jpg)
.jpg)
.jpg)
.jpg)
.jpg)
.jpg)
.jpg)
.jpg)
.jpg)
.jpg)
.jpg)
.jpg)
.jpg)
.jpg)
.jpg)
.jpg)
.jpg)
.jpg)
.jpg)
.jpg)
.jpg)
.jpg)
.jpg)
.jpg)
.jpg)
.jpg)
.jpg)
.jpg)
.jpg)
.jpg)
.jpg)
.jpg)
.jpg)
.jpg)
.jpg)
.jpg)
.jpg)
.jpg)
.jpg)
.jpg)
.jpg)
.jpg)
.jpg)
.jpg)
.jpg)
.jpg)
.jpg)
.jpg)
.jpg)
.jpg)
.jpg)
.jpg)
.jpg)
.jpg)
.jpg)
.jpg)
.jpg)
.jpg)
.jpg)
.jpg)
.jpg)
.jpg)
.jpg)
.jpg)
.jpg)
.jpg)
.jpg)
.jpg)
.jpg)
.jpg)
.jpg)
.jpg)
.jpg)