Configuring Win. 2000 DHCP Server for
Auto-Configuration of i2004/i2002 IP Phones
A DHCP (Dynamic Host Configuration Protocol) Server can be configured so that an IP phone will automatically learn its settings from it:
this can dramatically reduce the administrative overhead associated with bringing a large number of IP Phones online.
This document focuses exclusively on how to configure Windows 2000 DHCP Server to hand an i2004 IP Phone it's configuration data as well as the VLAN information that is required to take advantage of the Auto VLAN Discovery Feature.
In order to make use of the Auto VLAN Discovery feature, 2 VLAN's are required: one for the phone to boot into initially in order to communicate with the DHCP server and learn the appropriate Phone VLAN ID, and the second is the Phone VLAN itself. (Note: the i2004 phone must at least be using Firmware Revision 1.32 in order to use Auto VLAN Discovery).
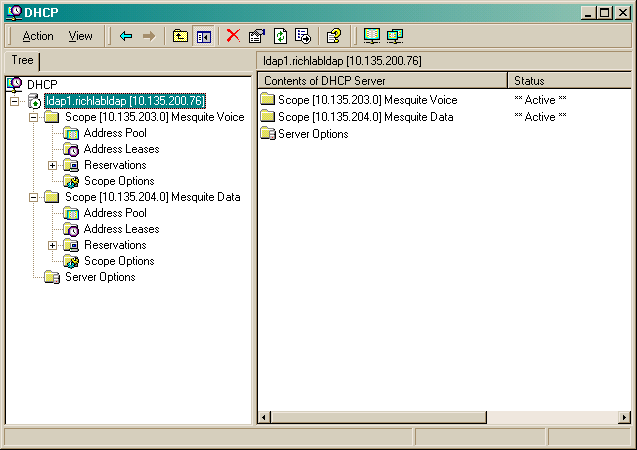
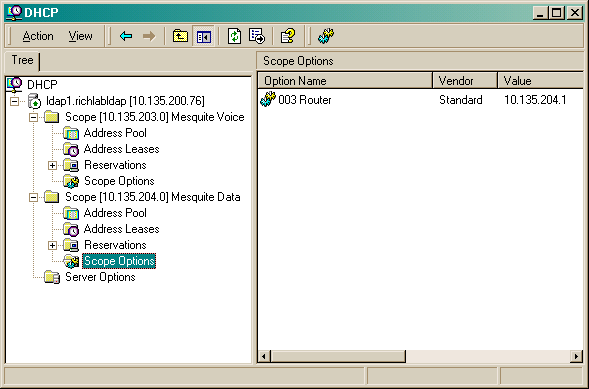
Begin by opening the DHCP Manager under Start/Programs/Administrative Tools
Highlight the name of the DHCP server as shown below. Note that the DHCP scopes for that particular server are listed below the server name and IP address.
Creating the DHCP Options
1. Select Action/Set Predefined Options to open the following screen:
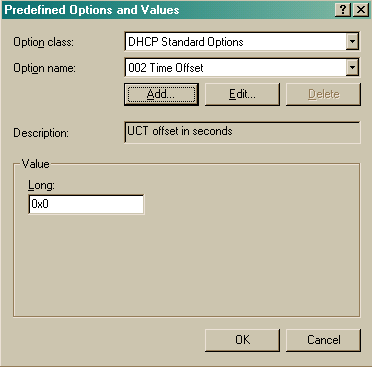
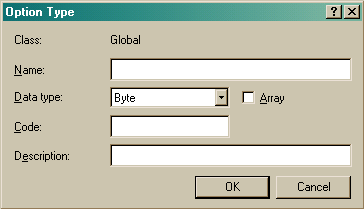
2. Select ADD to open the following screen:
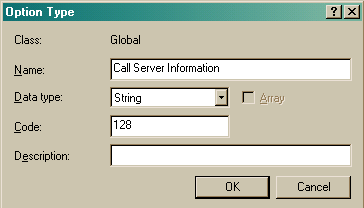
Creating the DHCP Option for the CALL Server Information
3. For the Name, type "Call Server Information".
- Set Data Type to "String"
- Set the Identifier to "128" for the Call Server configuration.
- Add comments if you want to. When finished it should appear like this:
Click OK, you should now be at the "Predefined Options and Values" screen.
Creating the DHCP Option for the Auto-Discovery VLAN ID Information
4. Select ADD again, and fill in the box shown below for the VLAN Auto-Discovery with the Identifier set to "191".
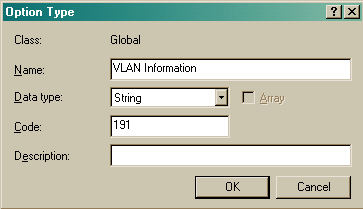
Click OK twice to return to the main DHCP screen.
Configuring the Call Server Information
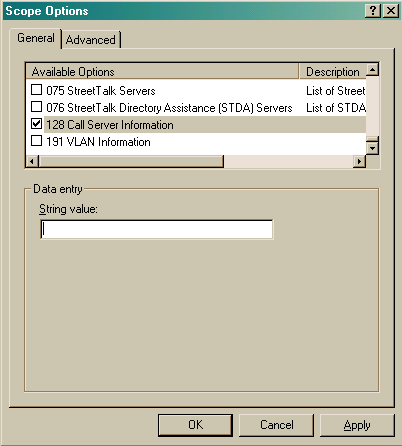
5. Select the Scope Options for the data (or boot) VLAN (or the Phone VLAN if you have reached step #10) that will be involved with the booting of the i2004 phone, and right click to select "Configure Options".
6. Scroll down the list until you find the two DHCP Options that you just created. Check mark the box on the left to enable the 128 Option as shown below.
7. Enter the String as shown below. The entry box is not long enough to display the entire string as you enter it, see below for the correct and complete syntax for the string. (Note: these parameters will be different from what is shown depending on your environment.) The DHCP Option #128 pertains to the Call Server information that the i2004 phone will need in order to connect to the Call Server.
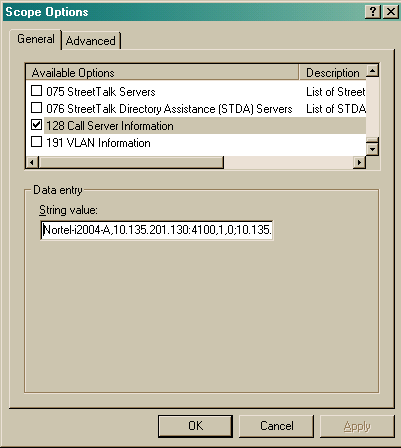
The format of the String for the 128 Site Specific Option is:
- Where:
Nortel-i2004-A - identifies that this is the Nortel option s1ip , s2ip - Primary/Secondary Call Server IP address p1 , p2 - Port number (4100 for CS1K, 7000 for BCM) a1 , a2 - Server Action Code, this is always 1 r1 , r2 - Server Retry Count, 5 is recommended
For example:
NOTES:
- The IP Address must be separated from the port by a colon (:).
- Primary (S1) and Secondary (S2) parameters are separated by a semicolon (;).
- The string must end in a period (.)
- The strings can be entered under "ACTIONS/PREDEFINED OPTIONS and VALUES" and will then subsequently appear automatically each time the option is added to a Scope.
Click APPLY.
Configuring the VLAN ID Information for Auto-Discovery of the Phone VLAN
8. Now select the 191 Site Specific Option complete the string entry box with the VLAN info using the syntax shown below.

The Site Specific Option #191 pertains to the VLAN ID Information that the i2004 Phone will require in order to boot into the Phone VLAN.
The format of the String for the 128 Site Specific Option is:
- Where:
"A" - Hardware Revision of the i2004 IP Phone "vvvv" - The VLAN ID in Decimal
There must be a colon (:) separating the Hardware Revision from the VLAN ID. The string must also end in a period (.)
Click APPLY, then OK.
9. Repeat steps 5 to 8 to setup the DHCP Auto Configuration parameters for the Phone's VLAN. All entries for the Phone VLAN should be identical to the entries for the default booting VLAN.
10. In order for the i2004 IP Phone to take advantage of this configuration it should be setup in the following manner:
- Set the DHCP Option on the Phone to "1" to use DHCP,
- Set the phone to use "FULL DHCP" by selecting "0",
- Set the phone to learn its VLAN ID from the DHCP server by selecting "2" for "Automatic".
(Note: Full DHCP must be used in order to obtain the necessary information from the DHCP Server.)
See also: Nortel-DHCP 