Adding Vonage VoIP trunks
Preamble: these are the steps required to interface a Vonage VoIP Phone Adapter (analog) to a Meridian XCOT trunk card, and how to assign an access code so that PBX users can share the service. For further details visit the Vonage website: https://www.vonageforhome.com/
Items and information needed prior to installation:
1. Vonage service plus 'Phone Adapter' provided by Vonage
2. Location for Vonage router, preferably in PBX/server room
3. Phone line from Vonage router to MDF in telephone frame room
4. Network interface cable from 'Phone Adapter' to internet
5. Available COT trunk or trunks on telephone switch.
NOTE: A spare COT trunk port can be found via pbx command prompt as follows:
- Goto:
ld 20- Type:
luuat REQ prompt- Type:
trkat TYPE prompt- Press enter until you get results, this will give you all the available cot trunk ports.
A NT8D14 Universal trunk, or NTCK16 XFCOT/PPM card has 8 analog trunk circuits: units 0-7, on odd pairs (1,3,5,7,9,11,13,15).
The BIX label for the PBX card slot should look similar to the following:
| TR 0 | - | TR 1 | - | TR 2 | - | TR 3 | - | TR 4 | - | TR 5 | - | TR 6 | - | TR 7 | - | |||||||||||
| Universal trunk (XCOT) | ||||||||||||||||||||||||||
|---|---|---|---|---|---|---|---|---|---|---|---|---|---|---|---|---|---|---|---|---|---|---|---|---|---|---|
| TR 0 | - | TR 1 | - | TR 2 | - | TR 3 | - | TR 4 | - | TR 5 | - | TR 6 | - | TR 7 | - | |||||||||||
6. Available Access code on telephone switch.
NOTE: An available access code can be found via pbx command prompt as follows:
- Goto:
ld 20- Type:
prtat REQ prompt- Type:
ludnat TYPE prompt for a list of available numbers which can be used for access code and route number.
7. Available route number on telephone switch which can be found from above NOTE.
Considerations Prior to Installation:
1. Decide who should have access to this route. This will be enforced through
TGAR on the telephone set and TARG on the route. The rule is that if the TGAR on the set
matches the TARG on the route, access will be blocked. Therefore, set the TARG on the route to a
different number than the TGAR on the telephone sets you want access to the VOIP line. eg: TARG 1 2 3 4 6 7 8 9 will only allow sets with TGAR 5 to access this route. Take access to other routes into account.
2. How many lines are needed in the trunk group? You will need one router for each 2 lines
you want. With each Vonage subscription you have you will get one line in and out to be
shared by all. Vonage says they can keep one number for anyone in
the states wishing to call the number with each line having a different account number.
For each line you pay an activation fee and the first months service fee. The Vonage
customer service number is 1-866-243-4357
3. What U.S. number do you want? The most logical choice is to choose a number that will
benefit the highest number of callers, eg, for whom do you want to be a local call?
4. Do you want a fax line? You can just give the fax line access to the VOIP line through
TGAR or if you would want a dedicated incoming fax line, one of the ports on the Cisco
router would have to be used for the Fax line. In this case you wouldn't hook that
line into the telephone switch, but run it directly to the phone jack where the fax line
connects. The fax service is free for Small Business users.
5. Do you want to bill back to users? If so you will need to set CDR to yes on the VOIP
route in ld16.
Vonage Box:
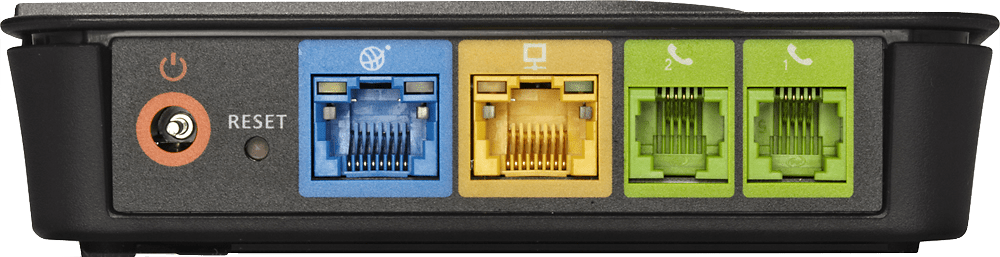
Vonage Box™ Model VDV22/VDV23
Restore factory defaults: press RESET for >10 secs.
Solid blue lights are good, blinking indicates a problem!
 | Power |
 | Internet (WAN) |
 | Ethernet (LAN) |
 | Phone 2 (PBX) * |
 | Phone 1 (PBX) |
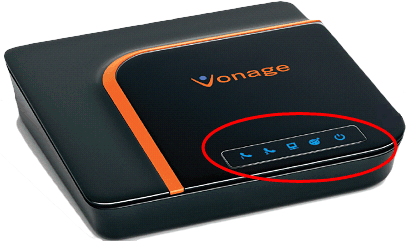
Blue Status LEDs
To access the web-based user interface:
- Connect a PC directly to the LAN port, open an internet browser
- Enter 192.168.15.1 or V-Configure in the browser address bar
- Enter User Name and Password, which by default is router for both
- Click Go and choose a setup option: Basic, Advanced, or click Help
Connect Phone 1 to the PBX trunk port TN. * Phone 2 is not usually configured/used (blue LED off).
Wait for the Phone 1/2 LED to light solid blue before using. Slow blinking indicates voicemail message waiting.
PBX programming:
1. Build route in switch using the trunk number and access code decided in previous steps. Press <Enter> for any prompt not listed below to accept the default. The route is built as follows:
- Log into telephone switch
- Go to LD16
REQ new
TYPE rdb
CUST 0
ROUT X        X is the route number chosen prior
DES VOIP      description, to identify the route
TKTP cot
PRIV no
RPA no
SAT no
RCLS ext
DTRK no
ISDN no
PTYP aco      analog CO trunk (default)
AUTO yes      auto-terminate, set the answer DN (ATDN) on trunk
ICOG iao
RANX no
SRCH lin      linear (LIN) or Round Robin (RRB)
TRMB yes
ACOD X        X is the access code decided prior
TARG X        Use the TARG decided prior
BILN no
Use defaults for the rest of the prompts in LD 16. If you want Call Detail Recording on Exacom or Callbill, set CDR to YES.
If Auto Terminate (AUTO) is set to YES, incoming calls will terminate on the DN set by the ATDN prompt in LD 14. Otherwise, incoming calls will terminate at the console.
- Go to LD14 to build route member or members
NOTE: You will need to do this for each analog trunk line you are adding.
REQ new
TYPE cot
TN X          use the TN or TN's from LUU command prior
DES VOIP X    something consistent with the Route DES to help identify it
XTRK xcot
FWTM no
TRK anlg
NCOS X        enter an NCOS consistent with site plan (eg, 5)
RTMB X Y      where X is the route number, Y is the member number
NITE 0
ATDN 0        Auto Terminate DN, the trunk answer point (if Route AUTO=YES)
SIGL lop
SUPN no
AST no
CLS unr dtn cnd wta clid   DTN for tone (DTMF) dialing
Press Enter again and you should be finished, and back to the REQ prompt.
NOTE: Again, the steps in LD14 are repeated for each trunk line you add. The member number would just increase by one each time, and the DES should change to reflect member number. This completes the changes in software for the route, just make sure the TGAR on each telephone set is configured for access to the route.
2. Follow directions sent by Vonage with the router, and setup service over an internet connection. You may need a static ip address.
3. Test service by plugging an analog phone into the phone port of router. Check for dial tone and make sure you can initiate and receive calls.
4. Connect phone cable run from the router to the MDF. This cable will go into the phone jack on the router and to the TR pair on the MDF for the TN assigned to the VOIP route. This step will be repeated for each line in the trunk group.
5. Test installation by:
- Going to a telephone set with access to trunk group
- Dial the access code; make sure you have dial tone
- Dial the U.S. number either with or without the "1" in front of the area code and number. Example 202-647- 4000. Dial the number as if you were in the U.S.