CUCM and CallBill3
The Cisco CallManager is configured to output the call detail record (CDR) data files to a SFTP server using SFTP push protocol where they are stored in a depository folder. The CallBill Record Processor is configured to periodically poll this depository folder for the raw CDR files and process the CDR information to the CallBill databases for reporting purposes. Once processed the raw CDR files are moved to the CallBill “Archive” folder where they are stored for a pre-determined period, default is three months.
- Cisco CallManager Configuration -
Services Required
CallManager:
- Performs call processing and writes CDR, CMR data into flat files.
- The flat files are generated at a frequency determined by the CDR File Time Interval flag under Enterprise Parameters.
CDR Agent:
- Runs as a network service on every node in a cluster (including the Publisher).
- It polls the local directory for CDR, CMR flat files every 6 seconds.
- If finds new CDR, CMR flat files, it pushes CDR, CMR flat files from that node to the CDR Repository node (Publisher).
- Upon successful transfer, the system deletes the local copy of the file.
CDR Repository Manager:
- It runs as a Network Service on all nodes in a cluster. However, in reality only the CDR Repository Manager on the Publisher performs any actions. On all other nodes, the service simply starts up, but then goes to sleep.
- It creates the directory structure used by CAR services.
- It manages the flat files that are received from other nodes. When the file arrives on the CDR Repository node, the CDR Repository Manager detects it. The system archives the file in a directory that is dedicated to the date that is indicated by the timestamp that was placed in the file name when the file was created.
- Sends CDR files up to three outside billing servers.
- Maintains CDR files for a certain number of days, up to 30 days.
- Periodically check the disk usage and delete old files. The thresholds are configured using the CDR Management (covered later in the presentation).
- Generates alarm if the delivery is failed, or disk usage too high.
For every node that runs the CallManager service, the CDR Agent service on that node is responsible to transfer the flat files to the cdr_respository structure on the Publisher. If the CallManager service runs on the Publisher as well, then the CDR Agent service on the Publisher transfers the flat files to the cdr_repository directory structure on the Publisher. If billing servers are configured, then the CDR Repository Manager service on the Publisher transfers these flat files to the billing servers.
Configuration Steps:
- To enable CDR navigate to System ➤ Service Parameter ➤ Call Manager Service. Set the CDR Enabled Flag to True. This has to be done for all the nodes in the server.
- To set the CDR File Time Interval navigate to System ➤ Enterprise Parameters ➤ CDR Parameters. The default setting is 1 minute, Phoneware recommend 60 minutes.
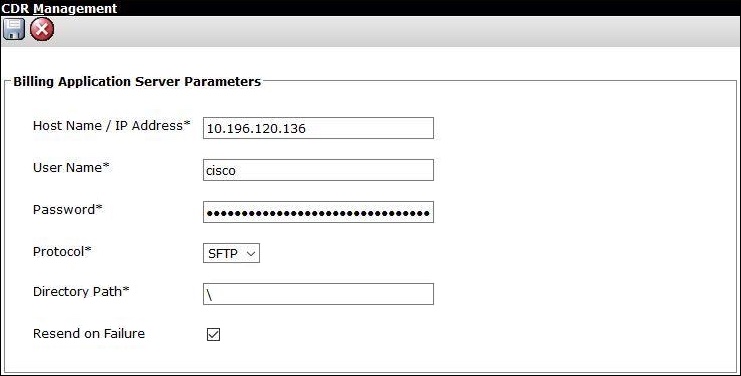
- Add the SFTP server/Billing Server where the files are to be sent. Navigate to Cisco Unified
Serviceability ➤ Tools ➤ CDR Management and add new billing server entering the User Name/Password as configured on the SFTP server.

- CallBill3 does not require CMR (Call Management Record) files so the generation of these record types should be disabled. This is the default setting but can be checked by navigating to System ➤ Service Parameter ➤ Call Manager Service ➤ Call Diagnostics Enabled.
- CallBill3 Record Processor Configuration -
The CallBill Record Processor has to be configured for the Cisco CDR record format, the location of
the CDR depository folder and the external gateway endpoints.

Site Settings:
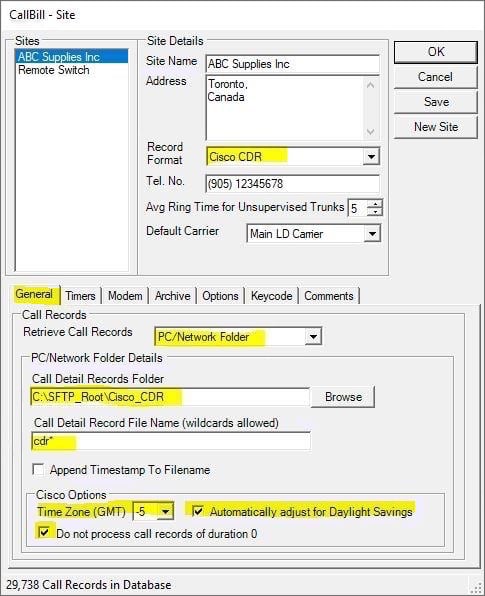
- Open the 'CallBill Record Processor/File/Site' window and set the Record Format option to Cisco_CDR from the drop-down list.
- Under the 'General' tab window set the Retrieve Call Records option to PC/Network Folder from the drop-down list.
- Using the Browse button set the Call Detail Records Folder to the SFTP Cisco CDR Depository folder.
- Set the Call Detail Record File Name setting to cdr*.
- Set Time Zone (GMT) to the time difference between the PC time and GMT, e.g. if the PC is set to EST then this option should be set to -5.
- Select the Do Not Process Call Records of Duration 0 option.
Click on the Save button to save the changes made. Restart the CallBill Record Processor to ensure that the changes were saved successfully. If this is not the case then the CallBill Record Processor has to be “Run as Administrator” to allow any changes made to be written to the Record Processor configuration file (cbrp.ini) in the C:\Windows folder.
Gateway Settings:
The gateway identifier information for each external endpoint has to be added to CallBill otherwise the endpoints will be considered as a local endpoint during call processing.
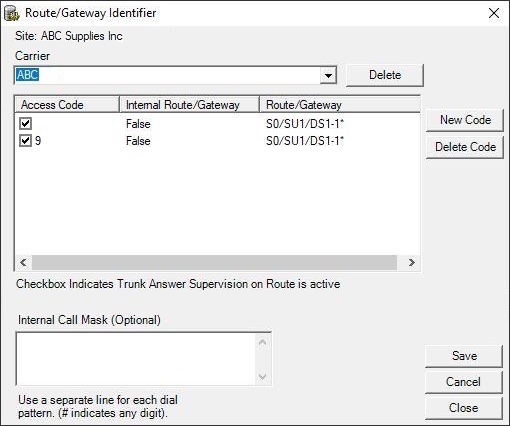
- Open the File/Route/Gateway window.
- Select the required Carrier from the Carrier list-box.
- Click on the New Code button to add a new entry for that carrier.
- If the dialled digits field in the CDR record includes an “access code” at the start of the field that should be stripped enter this value in the Access Code field, otherwise this field should be left blank.
- For external endpoints set the Internal Route/Gateway field to False.
- Enter the external endpoint identifier name in the Route/Gateway field. Note: Windows wildcards can be used to simplify entry.
- Click on the Save button the save the entry.

Contact:
For CallBill support, reach out to Phoneware Services.
| Email: | support@phoneware.ie |
| Telephone: | +353 404 68711 |
| US Toll Free: | 1-800 660 9248 |