FreePBX and Raspberry Pi

How to install Asterisk and FreePBX on the Raspberry Pi, using a Mac with OS X.
For information related to Raspberry Pi, check the original website at raspberrypi.org.Raspberry Pi is a trademark of the Raspberry Pi Foundation.

1Download the RasPBX disk image from: http://www.raspberry-asterisk.org/downloads/
2Erase a (4GB) compact flash card. The easiest way to do this is with Disk Utility:
- Press CMD SPACE to reveal the Spotlight search bar.
- In this search bar, type "disk utility" and press return to launch the Disk Utility application.
- Select the SD card in the left hand pane, and then select Erase ensuring that the format is MS-DOS (FAT).
Note: If your Compact Flash card is larger than 4GB, you can expand the file system later withraspi-config
3Open the Terminal application.
- Press CMD SPACE to reveal the Spotlight search bar.
- In this search bar, type "terminal", and press return to launch the Terminal application.
4Identify the compact flash disk, and unmount it (mine was /dev/disk1).
diskutil list- diskutil unmountdisk /dev/disk1
Note: In case of: Unmount of disk1 failed: at least one volume could not be unmounted,
append the number of the DOS_FAT_32 partition, eg: diskutil unmountdisk /dev/disk1s1
5Navigate to the RasPBX disk image location (downloads), and copy it with the DD command.
cd downloads- sudo dd if=raspbx-31-07-2014.img of=/dev/disk1 bs=2m
Be patient! The DD command will take a long time, and there is no progress indication.
Output from the commands in steps 4 and 5:
mbp:~ mike$ diskutil list
/dev/disk0
   #:                       TYPE NAME                    SIZE       IDENTIFIER
   0:      GUID_partition_scheme                        *250.1 GB   disk0
   1:                        EFI                         209.7 MB   disk0s1
   2:                  Apple_HFS MacHD                   249.2 GB   disk0s2
   3:                 Apple_Boot Recovery HD             650.0 MB   disk0s3
/dev/disk1
   #:                       TYPE NAME                    SIZE       IDENTIFIER
   0:     FDisk_partition_scheme                        *4.0 GB     disk1
   1:                 DOS_FAT_32 UNTITLED 1              4.0 GB     disk1s1
mbp:~ mike$ diskutil unmountdisk /dev/disk1
Unmount of all volumes on disk1 was successful
mbp:~ mike$ cd downloads
mbp:downloads mike$ sudo dd if=raspbx-31-07-2014.img of=/dev/disk1 bs=2m
Password:
1862+0 records in
1862+0 records out
3904897024 bytes transferred in 2033.352086 secs (1920423 bytes/sec)
mbp:~ mike$
6When finished, eject the flash card, plug it in your Raspberry Pi, and power up.
- After a few moments, you should be able to SSH (and/or HTTP) into the Raspberry Pi.
SSH: ssh root@raspbx.local
Web GUI: http://raspbx.local
Password: raspberry
Password: admin
Password: raspberry
7Run the following commands (in the Terminal application) to install the latest additions and improvements:
ssh root@raspbx.local- Console login, andraspbx-upgrade- install software upgrades.raspi-config- if the CF is larger than 4GB, expand the file system to fill it.
@@@@@@@@@@@@@@@@@@@@@@@@@@@@@@@@@@@@@@@@@@@@@@@@@@@@@@@@@@@
@    WARNING: REMOTE HOST IDENTIFICATION HAS CHANGED!     @
@@@@@@@@@@@@@@@@@@@@@@@@@@@@@@@@@@@@@@@@@@@@@@@@@@@@@@@@@@@
Enter the command: ssh-keygen -R raspbx.local or ssh-keygen -R <IP Address> and try again.
8Open Safari, enter the URL http://raspbx.local,
- Click FreePBX Administration, and log in with admin/admin (left image).


9Goto Applications ➤ Extensions and create a Generic SIP Device (center/right image).
- When configuring your client(s), the extension number is the username, the secret string is the password.
10Installing and registering SIP clients:
- Download and install Telephone (free) SIP softphone on your Mac. Open Preferences ➤ Accounts
- Add an account: domain name: raspbx.local, username is the extension number, and password the secret string.
- The softphone should register with your PBX, and immediately work! Call your VoiceMail with *98.
- Finally, if you have an iPhone or iPad, search for 3CX in the App Store (free). Install it, and add a new Account...
"User" & "ID" are the extension, "Password" is the secret string, and "Local Server IP" is raspbx.local
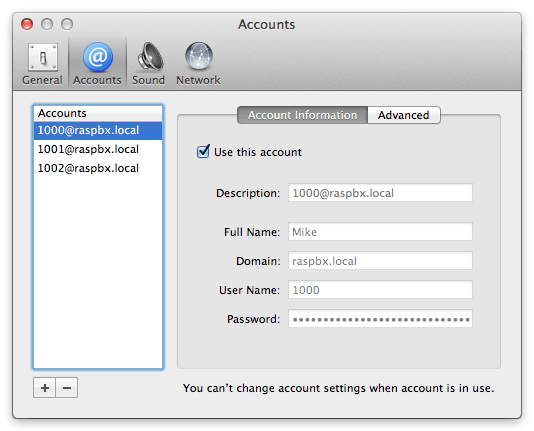
| 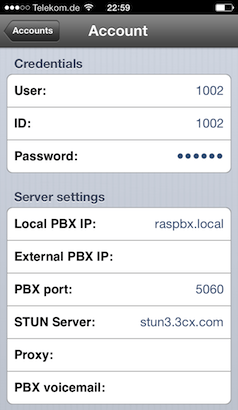 |
| Mac: "Telephone" Account Settings | iPhone: "3CX" Account Settings |
|---|
You can also use the terminal disk-copy technique above (steps 2 thru 5) to try out other software images.
For example, to turn your RaspberryPi into a media server with OpenELEC, or a retro-gaming console with RetroPie.
 |
ApplePi-Baker v2 is a GUI application which allows you to 'flash' an IMG file to an SD-Card, or make IMG backups without needing to use any OS X terminal commands. It's also useful for creating or restoring an IMG backup of USB drives! |